I think many of us felt quite excited and the same time disappointed with In-Memory OLTP in SQL Server 2014. It was the great and promising technology but it had way too many limitations. The biggest one for me, perhaps, was inability to use data types that required off-row storage. It was possible to address that by changing database schema, implementing data partitioning or performing other tricks; however, it required complex development efforts and often made In-Memory OLTP migration cost ineffective.
SQL Server 2016 removes this and many other limitations. Now we can create tables with (max) columns and with data rows that exceed 8,060 bytes. There is the catch, however. Off-row storage in In-Memory OLTP works very differently comparing to on-disk tables and incorrect design decisions could and would affect performance of the system. Today we will look at that in details.
As all of us know, In-Memory OLTP does not use the data pages. Well, it uses data pages in nonclustered range indexes but the data rows are stored as the separate in-memory objects. They are linked into the row chains through the regular memory pointers. Every index in In-Memory OLTP adds another pointer and creates another chain of the rows.
There are two types of indexes supported in In-Memory OLTP – hash and nonclustered (range) indexes. I do not want to dive into all the details but hash index, in the nutshell, consists of in-memory hash table where each element stores the pointer to the data row chain with the same hash value of the key. You can see the simplified version in Figure 1, which shows the table with two hash indexes on Name and City columns and assumes that hash function generates the hash based on the first letter of the string.
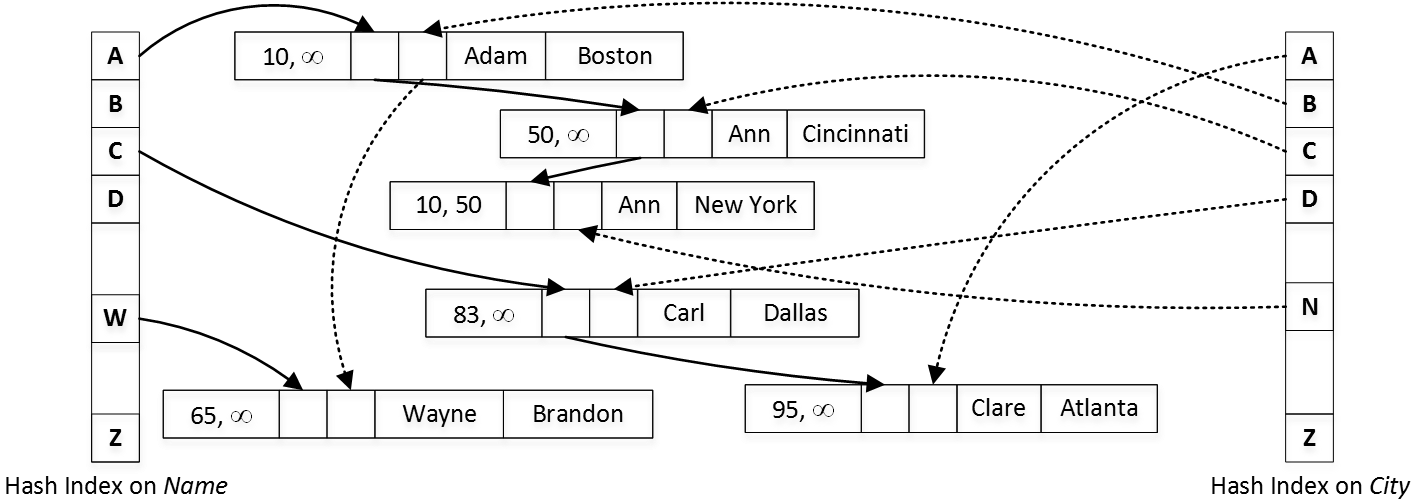
01. Hash Indexes
Each data row has two timestamps that indicate its lifetime. They store the Global Transaction Timestamp of the transactions that inserted and deleted them. For example, you can see two “Ann” rows in the diagram. The first one, with City = “New York” has been created by a transaction with timestamp of 10. The city was updated to Cincinnati by transaction with timestamp of 50, which deleted the old and created the new versions of the row.
The second In-Memory OLTP index type – range index is very similar to B-Tree index defined on on-disk table. The range index consists of the data pages on root, intermediate and leaf levels. On root and intermediate levels, every index row points to the data page on the next level. On the leaf level, index rows point to the actual data rows with the same value of index key. The data pages in the index reference each other through another array-life structure called the Mapping Table as it illustrated in Figure 2. For example, the index row Kevin on the root page references the first element (PID = 1) in the mapping table, which, in turn, stores the pointer to intermediate data page with the highest key value of Kevin.

02. Nonclustered (Range) Indexes
One of very key elements in this schema is that every index, in the nutshell, is covering. Every memory pointer references the actual data row structure regardless of how many columns were included to the index keys.
Every In-Memory OLTP object uses memory and is called a memory consumer. Memory Consumers allocate memory from the structures called varheaps – one varheap per In-Memory OLTP object. You can think about varheaps as the data structures that respond to and track memory allocation requests and can grow and shrink in size when needed. You can track detail memory-allocation information per-memory consumer using sys.dm_db_xtp_memory_consumers view.
Let’s look at the example and create the table with one hash and one nonclustered indexes and look at memory consumers as shown below.
create table dbo.MemoryConsumers
(
    ID int not null
        constraint PK_MemoryConsumers
        primary key nonclustered hash with (bucket_count=1024),
    Name varchar(256) not null,
    index IDX_Name nonclustered(Name)
)
with (memory_optimized=on, durability=schema_only);

select
    i.name as [Index], i.index_id, a.xtp_object_id, a.type_desc, a.minor_id
    ,c.memory_consumer_id, c.memory_consumer_type_desc as [mc type]
    ,c.memory_consumer_desc as [description], c.allocation_count as [allocs]
    ,c.allocated_bytes, c.used_bytes
from
    sys.dm_db_xtp_memory_consumers c join
        sys.memory_optimized_tables_internal_attributes a on
            a.object_id = c.object_id and a.xtp_object_id = c.xtp_object_id
    left outer join sys.indexes i on
            c.object_id = i.object_id and
            c.index_id = i.index_id and
            a.minor_id = 0
where
    c.object_id = object_id('dbo.MemoryConsumers');
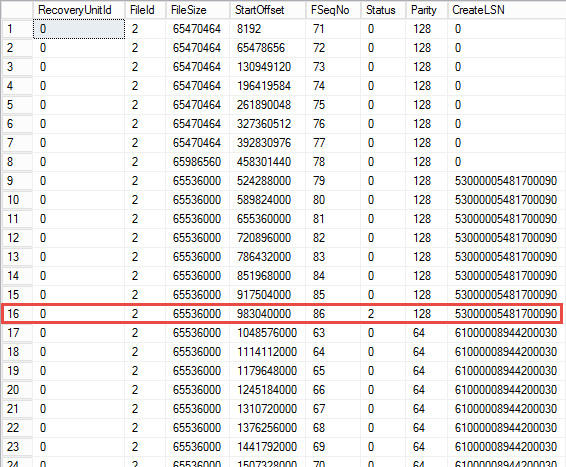
You can see the output of the query in Figure 3. The xtp_object_id column represents internal In-Memory OLTP object_id, which is different than SQL Server object_id.

03. Memory Consumers (In-Row Storage Only)
As you can see, the table has three memory consumers. The Range Index Heap stores internal and leaf pages of nonclustered index. The Hash Index Heap stores the hash table of the index. Finally, the Table Heap stores actual table rows. Figure 4 illustrates that.
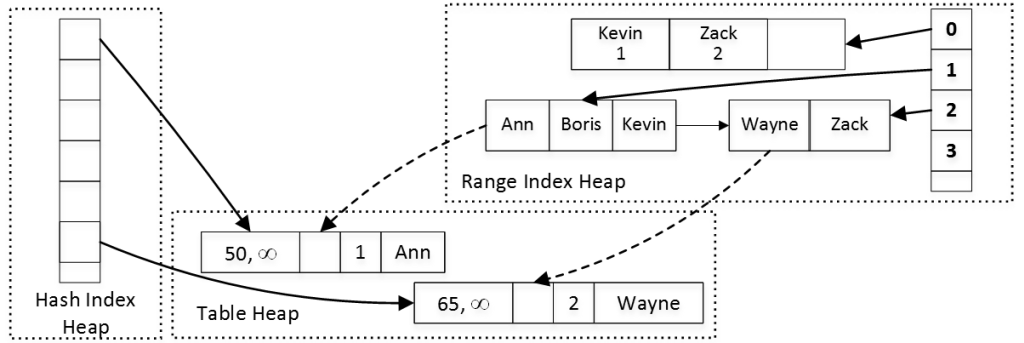
04. Memory Consumers
Now let’s see what will happen if we alter our table and add row-overflow and LOB columns using ALTER TABLE statement shown below. This alteration is offline operation, which rebuilds the table in the background.
alter table dbo.MemoryConsumers add
    RowOverflowCol varchar(8000),
    LOBCol varchar(max);
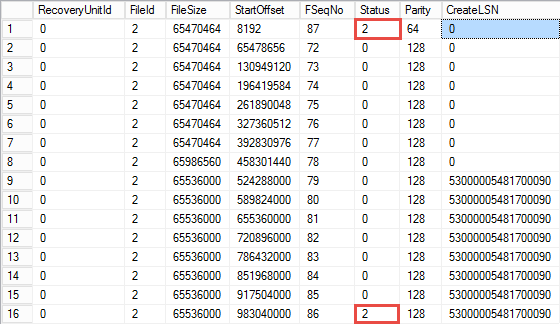
Now, if you get the list of memory consumers using the query from the first listing again, you would see the output as shown in Figure 5.

05. Memory Consumers with Off-Row Storage
As you can see, both off-row columns introduce their own Range Index Heap and Table Heap memory consumers. In addition, LOB column adds LOB Page Allocator memory consumer (more about it later). The minor_id column indicates the column_id in the table to which memory consumers belong.
As you can guess from the output, SQL Server 2016 stores both, row-overflow and LOB columns in the separate internal tables. Those tables consist of 8-byte artificial primary key implemented as nonclustered index and off-row column value. The main row references off-row column through that artificial key, which is generated when row is created. It is worth repeating that this reference is done though the artificial value rather than the memory pointer.
This approach allows In-Memory OLTP to decouple off-row columns from the main row using different lifetime for them. For example, if you update the main row data without touching off-row columns, SQL Server would not generate new versions of off-row column rows avoiding large memory allocations. Vice versa, when only off-row data is modified, the main row stays intact.
In-Memory OLTP stores LOB data in the memory provided by LOB Page Allocator. That consumer is not limited to 8,060-byte row allocations and can allocate large amount of memory to store the data. The rows in the Table Heap of LOB columns contains pointers to the row data in LOB Page Allocator.
Let’s assume that we run several DML statements with imaginary Global Transaction Timestamp values as shown below.
-- Global Transaction Timestamp: 100
insert into dbo.MemoryConsumers(ID, Name, RowOverflowCol, LobCol)
values
(1,'Ann','A1',replicate(convert(varchar(max),'1'),100000))
(2,'Bob','B1',replicate(convert(varchar(max),'2'),100000));

-- Global Transaction Timestamp: 110
update dbo.MemoryConsumers set RowOverflowCol = 'B2' where ID = 2;

-- Global Transaction Timestamp: 120
update dbo.MemoryConsumers set Name= 'Greg' where ID = 2;

-- Global Transaction Timestamp: 130
update dbo.MemoryConsumers set LobCol = replicate(convert(varchar(max),'3'),100000) where ID = 1;

-- Global Transaction Timestamp: 140
delete from dbo.MemoryConsumers where ID = 1;
Figure 6 illustrates the state of the data and links between the rows. It is omitting hash table and nonclustered index structures in the main table along with internal pages of nonclustered indexes for off-row columns for simplicity sake.

06. In-Row and Off-Row Rows – Decoupled
Decoupling of in-row and off-row data reduces the overhead of creating extra row versions during data modifications. However, it will add additional overhead when you insert and delete the data. SQL Server should create several row objects on insert stage and update end timestamp of multiple rows during deletion. It also needs to maintain nonclustered indexes for off-row column tables.
There is also considerable overhead in terms of memory usage. Every non-empty off-row value adds 50+ bytes of the overhead regardless of its size. Those 50+ bytes consist of three artificial ID values (in-row, off-row in data row and leaf-level of the range index) and off-row data row structure. It is even larger in case of LOB columns where data is stored in LOB Page Allocator.
One of the key points to remember that decision which columns go off-row is made based on the table schema. This is very different from on-disk tables, where such decision is made on per-row basis and depends on the data row size. With on-disk tables, data is stored in row when it fits on the data page.
In-Memory OLTP works in the different way. (Max) columns are always stored off-row. For other columns, if the data row size in the table definition can exceed 8,060 bytes, SQL Server pushes largest variable-length column(s) off-row. Again, it does not depend on amount of the data you store there.
Let’s look at the example and create two tables of the similar schema. One of the tables has twenty varchar(3) columns while another uses twenty varchar(max) columns. Let’s populate those tables with 100,000 rows with 1-character value in each column. The code is shown in listing below.
create table dbo.DataInRow
(
    ID int not null
        constraint PK_DataInRow
        primary key nonclustered hash(ID)
        with (bucket_count = 262144)
    ,Col1 varchar(3) not null
    ,Col2 varchar(3) not null
    ,Col3 varchar(3) not null
    ,Col4 varchar(3) not null
    ,Col5 varchar(3) not null
    ,Col6 varchar(3) not null
    ,Col7 varchar(3) not null
    ,Col8 varchar(3) not null
    ,Col9 varchar(3) not null
    ,Col10 varchar(3) not null
    ,Col11 varchar(3) not null
    ,Col12 varchar(3) not null
    ,Col13 varchar(3) not null
    ,Col14 varchar(3) not null
    ,Col15 varchar(3) not null
    ,Col16 varchar(3) not null
    ,Col17 varchar(3) not null
    ,Col18 varchar(3) not null
    ,Col19 varchar(3) not null
    ,Col20 varchar(3) not null
)
with (memory_optimized = on, durability = schema_only);

create table dbo.DataOffRow
(
    ID int not null
        constraint PK_DataOffRow
        primary key nonclustered hash(ID)
        with (bucket_count = 262144)
    ,Col1 varchar(max) not null
    ,Col2 varchar(max) not null
    ,Col3 varchar(max) not null
    ,Col4 varchar(max) not null
    ,Col5 varchar(max) not null
    ,Col6 varchar(max) not null
    ,Col7 varchar(max) not null
    ,Col8 varchar(max) not null
    ,Col9 varchar(max) not null
    ,Col10 varchar(max) not null
    ,Col11 varchar(max) not null
    ,Col12 varchar(max) not null
    ,Col13 varchar(max) not null
    ,Col14 varchar(max) not null
    ,Col15 varchar(max) not null
    ,Col16 varchar(max) not null
    ,Col17 varchar(max) not null
    ,Col18 varchar(max) not null
    ,Col19 varchar(max) not null
    ,Col20 varchar(max) not null
)
with (memory_optimized = on, durability = schema_only);


set statistics time on
insert into dbo.DataInRow(ID,Col1,Col2,Col3,Col4,Col5,Col6,Col7,Col8,Col9,Col10,Col11,Col12,Col13,Col14,Col15,Col16,Col17,Col18,Col19,Col20)
    select Num,'0','0','0','0','0','0','0','0','0','0','0','0','0','0','0','0','0','0','0','0'
    from dbo.Numbers
    where Num <= 100000;

insert into dbo.DataOffRow(ID,Col1,Col2,Col3,Col4,Col5,Col6,Col7,Col8,Col9,Col10,Col11,Col12,Col13,Col14,Col15,Col16,Col17,Col18,Col19,Col20)
    select Num,'0','0','0','0','0','0','0','0','0','0','0','0','0','0','0','0','0','0','0','0'
    from dbo.Numbers
    where Num <= 100000;
set statistics time off
Figure 7 illustrates memory consumers in this scenario (in-row at top and off-row at the bottom). As you can see, every varchar(max) column adds another internal table to the mix.
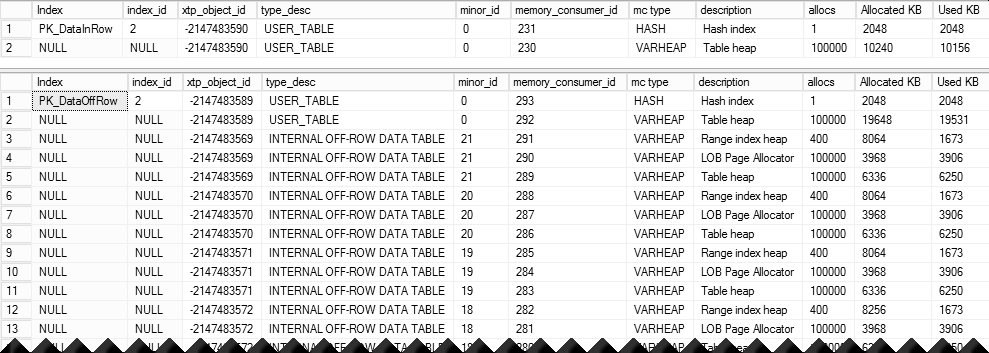
07. Test Table Memory Consumers
The execution times of INSERT statements n my environment are 153 and 7,722 milliseconds respectively. With off-row storage, In-Memory OLTP needs to add data to twenty other internal tables, which is 40 times slower comparing to in-row storage.
Let’s look at the total memory usage of both tables using the queries below.
select
   sum(c.allocated_bytes) / 1024 as [Allocated KB]
    ,sum(c.used_bytes) / 1024 as [Used KB]
from
    sys.dm_db_xtp_memory_consumers c join
        sys.memory_optimized_tables_internal_attributes a on
            a.object_id = c.object_id and a.xtp_object_id = c.xtp_object_id
    left outer join sys.indexes i on
            c.object_id = i.object_id and c.index_id = i.index_id
where
    c.object_id = object_id('dbo.DataInRow');

select
   sum(c.allocated_bytes) / 1024 as [Allocated KB]
    ,sum(c.used_bytes) / 1024 as [Used KB]
from
    sys.dm_db_xtp_memory_consumers c join
        sys.memory_optimized_tables_internal_attributes a on
            a.object_id = c.object_id and a.xtp_object_id = c.xtp_object_id
    left outer join sys.indexes i on
            c.object_id = i.object_id and c.index_id = i.index_id
where
    c.object_id = object_id('dbo.DataOffRow');
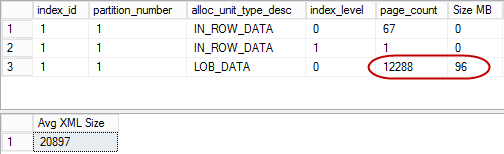
As you can see in Figure 8, off-row storage uses about 252MB of RAM comparing to 12MB of RAM with in-row storage.
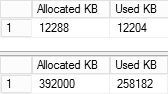
08. Test Tables Memory Usage
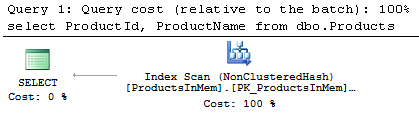
There is another important implication. Indexes defined on the table are not covering off-row data. SQL Server needs to traverse nonclustered indexes on off-row column tables to obtain their values. Conceptually, it looks very similar to Key Lookup operations in on-disk tables done in reverse direction – from clustered to nonclustered indexes. Even though the overhead is significantly smaller comparing to on-disk tables, it is still the overhead you’d like to avoid.
You can see this overhead by running SELECT statements shown below. In case of off-row data, SQL Server will have to go through every internal table for each row.
select count(*)
from dbo.DataInRow
where Col1='0' and Col2='0' and Col3='0' and Col4='0' and Col5='0' and Col6='0' and Col7='0' and Col8='0' and Col9='0' and Col10='0' and Col11='0' and Col12='0' and Col13='0' and Col14='0' and Col15='0' and Col16='0' and Col17='0' and Col18='0' and Col19='0' and Col20='0';

select count(*)
from dbo.DataOffRow
where Col1='0' and Col2='0' and Col3='0' and Col4='0' and Col5='0' and Col6='0' and Col7='0' and Col8='0' and Col9='0' and Col10='0' and Col11='0' and Col12='0' and Col13='0' and Col14='0' and Col15='0' and Col16='0' and Col17='0' and Col18='0' and Col19='0' and Col20='0';
Execution time in my environment is 73 milliseconds for in-row data and 1,662 milliseconds for off-row data.
Finally, let’s look what happen when we delete the data from the tables by using the code below.
delete from dbo.DataInRow;
delete from dbo.DataOffRow;
As before, in-row storage is significantly faster – 28 milliseconds vs. 1,290 milliseconds. As you can guess In-Memory OLTP had to update end timestamp in every row in off-row tables.
You should remember about this behavior and avoid off-row storage unless you have legitimate reasons to use such columns. It is clearly the bad idea to define text columns as (n)varchar(max) just in case – when you do not store large amount of data there. As you see, off-row storage comes at very high cost.
Source code is available for download.
Slide deck on the topic is also available.