Tag Archives: Data Partitioning

Splitting and Merging Non-Empty Partitions in Columnstore Indexes

Last week we discussed how to implement Sliding Window pattern in the tables with columnstore indexes. As I promised, today we are going to focus on partition management in such tables.

As you will remember, SQL Server does not allow you to split and merge non-empty columnstore partitions. I personally do not consider it as the huge limitation – perhaps because I rarely have reasons to do it in columnstore tables. However, there are still some cases when it may be required.

As one of examples, think about a table, partitioned by date, which may be populated with incorrect data from the future. Perhaps due to some issues in ETL processes. Some rows may be placed to incorrect (future) partition, which would prevent its split.

The common, by the book approach recommends dropping columnstore index, splitting or merging partitions and recreating the index afterwards. As you can imagine, it would lead to extremely inefficient process with huge amount of unnecessary overhead on large tables. After all, you have to drop and recreate columnstore index, converting table to Heap, while just subset of the partitions needs to be rebuilt. Fortunately, you can minimize the overhead with simple workaround:

  1. Switch partition(s) to split or merge to the separate staging table
  2. Split or merge partition(s) in the main table. You can do that because partitions will be empty after the previous step
  3. Drop columnstore index in the staging table, split/merge partition(s) there and recreate the index afterwards
  4. Switch partition(s) back from staging to the main table.

Let’s look at the process in details. I am going to recreate the tables I used last week with the script below.

create partition function pfOrders(datetime2(0))
as range right for values
('2016-11-01','2016-12-01','2017-01-01','2017-02-01'
,'2017-03-01','2017-04-01','2017-05-01','2017-06-01'
,'2017-07-01','2017-08-01','2017-09-01','2017-10-01'
,'2017-11-01','2017-12-01','2018-01-01');

create partition scheme psOrders 
as partition pfOrders
all to ([Primary]);

create table dbo.Orders
(
        OrderDate datetime2(0) not null,
        OrderId int not null,
        Placeholder char(100),
)
on psOrders(OrderDate);

create table dbo.OrderLineItems
(
        OrderDate datetime2(0) not null,
        OrderId int not null,
        OrderLineItemId int not null,
        Placeholder char(100),
)
on psOrders(OrderDate);
go

-- Left-most and right-most are empty
;with N1(C) as (select 0 union all select 0) -- 2 rows
,N2(C) as (select 0 from N1 as t1 cross join N1 as t2) -- 4 rows
,N3(C) as (select 0 from N2 as t1 cross join N2 as t2) -- 16 rows
,N4(C) as (select 0 from N3 as t1 cross join N3 as t2) -- 256 rows
,N5(C) as (select 0 from N4 as t1 cross join N4 as t2) -- 65,536 rows
,Ids(Id) as (select row_number() over (order by (select null)) from N5)
insert into dbo.Orders(OrderDate, OrderId)
        select dateadd(day,Id % 390,'2016-11-01'), ID
        from Ids;

insert into dbo.OrderLineItems(OrderDate,OrderId, OrderLineItemId)
        select OrderDate, OrderId, OrderId
        from dbo.Orders;
go

create clustered columnstore index CCI_Orders on dbo.Orders
on psOrders(OrderDate);

create clustered columnstore index CCI_OrderLineItems on dbo.OrderLineItems
on psOrders(OrderDate);
go

select 
        t.object_id, i.index_id, i.name as [Index], p.partition_number,
        p.[Rows], p.data_compression_desc, 
        fg.name as [Filegroup],
        sum(a.total_pages) as TotalPages, 
        sum(a.used_pages) as UsedPages, 
        sum(a.data_pages) as DataPages,
        sum(a.total_pages) * 8 as TotalSpaceKB, 
        sum(a.used_pages) * 8 as UsedSpaceKB, 
        sum(a.data_pages) * 8 as DataSpaceKB
from 
        sys.tables t with (nolock) join sys.indexes i with (nolock) on
                t.object_id = i.object_id
        join sys.partitions p with (nolock) on 
                i.object_id = p.object_id AND i.index_id = p.index_id
        join sys.allocation_units a with (nolock) on 
                p.partition_id = a.container_id
        join sys.filegroups fg with (nolock) on 
                a.data_space_id = fg.data_space_id
where
        t.object_id = object_id(N'dbo.Orders')
group by
        t.object_id, i.index_id, i.name, p.partition_number,
        p.[Rows], p.data_compression_desc, fg.name
order by 
        i.index_id, p.partition_number;

Figure 1 demonstrates data distribution across partitions in the dbo.Orders table. As you can see, we have 13 non-empty partitions started from November 2016 up to end of November 2017.

01.Initial Data Distribution

Let’s assume that we would like to merge November and December 2016 together, which are partitions 2 and 3 in the tables.

As the first step, we will create the staging tables. They need to be partitioned in the same way as the main tables. It is better to use separate partition function to decouple merge and split operations in main and staging tables from each other. Remember that SQL Server would hold schema modification (Sch-M) lock on all tables that use partition function for the duration of merge and split operations.

Partition function on the staging tables does not need to include all partitions from the main tables. It just need to include partition(s) you are about it split or merge and two adjacent partitions on the left and right sides. This will guarantee that partitions in the main and staging tables are aligned before and after the operation. It would also support partition switch without requirement of creating extra CHECK constraints on the staging tables. As you can see in the code below, pfOrdersStaging function consists of four partitions:

  • Everything prior November 2016. Will be empty.
  • November 2016
  • December 2016
  • Everything on or after January 1st 2017. Will be empty
create partition function pfOrdersStaging(datetime2(0))
as range right for values
('2016-11-01','2016-12-01','2017-01-01');

create partition scheme psOrdersStaging
as partition pfOrdersStaging
all to ([Primary]);

create table dbo.OrdersStaging
(
        OrderDate datetime2(0) not null,
        OrderId int not null,
        Placeholder char(100),
)
on psOrdersStaging(OrderDate);

create clustered columnstore index CCI_OrdersStaging on dbo.OrdersStaging
on psOrdersStaging(OrderDate);

create table dbo.OrderLineItemsStaging
(
        OrderDate datetime2(0) not null,
        OrderId int not null,
        OrderLineItemId int not null,
        Placeholder char(100),
)
on psOrdersStaging(OrderDate);

create clustered columnstore index CCI_OrderLineItemsStaging on dbo.OrderLineItemsStaging
on psOrdersStaging(OrderDate);

After the staging tables are created, we can switch two partitions from the main tables there.

alter table dbo.Orders switch partition 2 
to dbo.OrdersStaging partition 2;

alter table dbo.OrderLineItems switch partition 2 
to dbo.OrderLineItemsStaging partition 2;

alter table dbo.Orders switch partition 3
to dbo.OrdersStaging partition 3;

alter table dbo.OrderLineItems switch partition 3
to dbo.OrderLineItemsStaging partition 3;

Now we can merge the partitions in the main tables. SQL Server will allow us to proceed because they are empty after the switch.

alter partition function pfOrders() merge range ('2016-12-01');

Finally, we can merge partitions in our staging tables and switch them back to the main tables as shown below.

drop index CCI_OrdersStaging on dbo.OrdersStaging;
drop index CCI_OrderLineItemsStaging on dbo.OrderLineItemsStaging;
go

-- Offline with Sch-M
alter partition function pfOrdersStaging()
merge range ('2016-12-01');
go

create clustered columnstore index CCI_OrdersStaging on dbo.OrdersStaging
on psOrdersStaging(OrderDate);

create clustered columnstore index CCI_OrderLineItemsStaging on dbo.OrderLineItemsStaging
on psOrdersStaging(OrderDate);
go

-- Switching partitions back
alter table dbo.OrdersStaging switch partition 2 
to dbo.Orders partition 2;

alter table dbo.OrderLineItemsStaging switch partition 2 
to dbo.OrderLineItems  partition 2;

As you can see in Figure 2, now partition 2 stores the data for both November and December  of 2016.

02.Data Distribution After Merge

We can use the same approach for partition split. Code below demonstrates how to split November 2017 partition using 2017-11-15 as the new range value.

-- Spliting November 2017 partition (#13)
-- Recreating Staging objects first
drop table if exists dbo.OrdersStaging;
drop table if exists dbo.OrderLineItemsStaging;
if exists(select * from sys.partition_schemes where name = 'psOrdersStaging') drop partition scheme psOrdersStaging;
if exists(select * from sys.partition_functions where name = 'pfOrdersStaging') drop partition function pfOrdersStaging;
go

create partition function pfOrdersStaging(datetime2(0))
as range right for values
('2017-11-01','2017-12-01');

create partition scheme psOrdersStaging
as partition pfOrdersStaging
all to ([Primary]);

create table dbo.OrdersStaging
(
        OrderDate datetime2(0) not null,
        OrderId int not null,
        Placeholder char(100),
)
on psOrdersStaging(OrderDate);

create clustered columnstore index CCI_OrdersStaging on dbo.OrdersStaging
on psOrdersStaging(OrderDate);

create table dbo.OrderLineItemsStaging
(
        OrderDate datetime2(0) not null,
        OrderId int not null,
        OrderLineItemId int not null,
        Placeholder char(100),
)
on psOrdersStaging(OrderDate);

create clustered columnstore index CCI_OrderLineItemsStaging on dbo.OrderLineItemsStaging
on psOrdersStaging(OrderDate);

-- Switching partitions to the staging table
alter table dbo.Orders switch partition 13
to dbo.OrdersStaging partition 2;

alter table dbo.OrderLineItems switch partition 13
to dbo.OrderLineItemsStaging partition 2;
go

-- Splitting partition in the main table 
alter partition scheme psOrders 
next used [PRIMARY];

alter partition function pfOrders()
split range ('2017-11-15');
go

-- Now spllitting partition in the Staging table
drop index CCI_OrdersStaging on dbo.OrdersStaging;
drop index CCI_OrderLineItemsStaging on dbo.OrderLineItemsStaging;
go

-- Offline with Sch-M
alter partition scheme psOrdersStaging 
next used [PRIMARY];

alter partition function pfOrdersStaging()
split range ('2017-11-15');
go

create clustered columnstore index CCI_OrdersStaging on dbo.OrdersStaging
on psOrdersStaging(OrderDate);

create clustered columnstore index CCI_OrderLineItemsStaging on dbo.OrderLineItemsStaging
on psOrdersStaging(OrderDate);

-- Switching partitions back
alter table dbo.OrdersStaging switch partition 2 
to dbo.Orders partition 13;

alter table dbo.OrdersStaging switch partition 3 
to dbo.Orders partition 14;

alter table dbo.OrderLineItemsStaging switch partition 2 
to dbo.OrderLineItems  partition 13;

alter table dbo.OrderLineItemsStaging switch partition 3
to dbo.OrderLineItems  partition 14;

As you can see, with just a few extra operators, we were able to remove the overhead of rebuilding columnstore index on entire table.

Unfortunately, this is offline approach. The data in the main tables would become inconsistent as soon as you switch partitions to the staging tables. Fortunately, if data is static, you can address it with some coding.

Instead of switching partitions to the staging tables, you can copy the data there. After split or merge is done in the staging tables, you can empty source partitions by switching them to another, temporary tables, and switch data back from the staging tables.

The code below illustrates this approach.

-- If data in the table is static 
-- Let's merge November-December 2016 and January 2017 
drop table if exists dbo.OrdersStaging;
drop table if exists dbo.OrderLineItemsStaging;
if exists(select * from sys.partition_schemes where name = 'psOrdersStaging') drop partition scheme psOrdersStaging;
if exists(select * from sys.partition_functions where name = 'pfOrdersStaging') drop partition function pfOrdersStaging;
go

create partition function pfOrdersStaging(datetime2(0))
as range right for values
('2016-11-01','2017-01-01','2017-02-01');

create partition scheme psOrdersStaging
as partition pfOrdersStaging
all to ([Primary]);

create table dbo.OrdersStaging
(
        OrderDate datetime2(0) not null,
        OrderId int not null,
        Placeholder char(100),
)
on psOrdersStaging(OrderDate);

create clustered columnstore index CCI_OrdersStaging on dbo.OrdersStaging
on psOrdersStaging(OrderDate);

create table dbo.OrderLineItemsStaging
(
        OrderDate datetime2(0) not null,
        OrderId int not null,
        OrderLineItemId int not null,
        Placeholder char(100),
)
on psOrdersStaging(OrderDate);

create clustered columnstore index CCI_OrderLineItemsStaging on dbo.OrderLineItemsStaging
on psOrdersStaging(OrderDate);

-- Copying data from Main to Staging tables
insert into dbo.OrdersStaging(OrderDate,OrderId,Placeholder)
        select OrderDate, OrderId, Placeholder
        from dbo.Orders
        where $Partition.pfOrders(OrderDate) in (2,3);

insert into dbo.OrderLineItemsStaging(OrderDate,OrderId,OrderLineItemId,Placeholder)
        select OrderDate, OrderId, OrderLineItemId, Placeholder
        from dbo.OrderLineItems
        where $Partition.pfOrders(OrderDate) in (2,3);
go

-- Merging partitions in Staging tables
drop index CCI_OrdersStaging on dbo.OrdersStaging;
drop index CCI_OrderLineItemsStaging on dbo.OrderLineItemsStaging;
go

alter partition function pfOrdersStaging()
merge range ('2017-01-01');
go

create clustered columnstore index CCI_OrdersStaging on dbo.OrdersStaging
on psOrdersStaging(OrderDate);

create clustered columnstore index CCI_OrderLineItemsStaging on dbo.OrderLineItemsStaging
on psOrdersStaging(OrderDate);
go

-- Creating temporary table to switch original
-- partitions from the main table
create partition function pfOrdersTmp(datetime2(0))
as range right for values
('2016-11-01','2017-01-01','2017-02-01');

create partition scheme psOrdersTmp
as partition pfOrdersTmp
all to ([Primary]);

create table dbo.OrdersTmp
(
        OrderDate datetime2(0) not null,
        OrderId int not null,
        Placeholder char(100),
)
on psOrdersTmp(OrderDate);

create clustered columnstore index CCI_OrdersTmp on dbo.OrdersTmp
on psOrdersTmp(OrderDate);

create table dbo.OrderLineItemsTmp
(
        OrderDate datetime2(0) not null,
        OrderId int not null,
        OrderLineItemId int not null,
        Placeholder char(100),
)
on psOrdersTmp(OrderDate);

create clustered columnstore index CCI_OrderLineItemsTmp on dbo.OrderLineItemsTmp
on psOrdersTmp(OrderDate);

-- Final steps. Let's do it in transaction
-- All operations are on metadata level
set xact_abort on
begin tran
        -- Switching original partitions out
        alter table dbo.Orders switch partition 2 
        to dbo.OrdersTmp partition 2;

        alter table dbo.OrderLineItems switch partition 2 
        to dbo.OrderLineItemsTmp partition 2;

        alter table dbo.Orders switch partition 3
        to dbo.OrdersTmp partition 3;

        alter table dbo.OrderLineItems switch partition 3
        to dbo.OrderLineItemsTmp partition 3;

        -- Merge
        alter partition function pfOrders()
        merge range ('2017-01-01');

        -- Switching partitions from the staging table
        alter table dbo.OrdersStaging switch partition 2 
        to dbo.Orders partition 2;

        alter table dbo.OrderLineItemsStaging switch partition 2 
        to dbo.OrderLineItems  partition 2;
commit;
go

-- Dropping temporary tables
drop table dbo.OrderLineItemsTmp;
drop table dbo.OrdersTmp;
drop partition scheme psOrdersTmp;
drop partition function pfOrdersTmp;

As you can see, this implementation is relatively simple and considering that data in columnstore indexes is often static, you may be able to utilize it to perform partition maintenance transparently to the users.

Source code is available for download.

Implementing Sliding Windows Data Purge Pattern with Columnstore Indexes

It’s been a while since my last blog post. Many things happened, including another great PASS Summit where I presented the session of Data Partitioning (by the way, you can download the slides and demos from my Presentation page). As usual, I ran out of time 🙂

As many of you know, Data Partitioning is very big and complex subject, which is impossible to cover even with half-day session. One of the topics I left out of scope is how it plays with columnstore indexes. Even though partitioned columnstore tables are similar to B-Tree ones, there are some differences between them.

The biggest difference resides in partition function split and merge behavior. With B-Tree indexes, you can split and merge non-empty partitions. SQL Server would split or merge the data automatically, granted with the schema-modification (Sch-M) table lock held in place. Other sessions would be unable to access the table but at least split and merge would work.

This is not the case with columnstore indexes where you would get the error when you try to split or merge non-empty partitions. There are several reasons for this limitation. Without diving very deep into columnstore index internals, I could say that the only option of doing split of merge internally is rebuilding columnstore index on affected partitions. Fortunately, you can split and merge empty columnstore partitions, which allow you to workaround the limitation and also implement Sliding Window pattern and use partitioning to purge the data.

The Sliding Window pattern stands for scenario when we want to retain the data for some period of time. Consider the situation when we need to keep last 12 months of data. In the beginning of each month, we may purge the data that is older than 12 months, basically having a window on the data that slides purging the oldest data, based on a given schedule.

Data partitioning is great in this scenario. It allows to keep the purge process on metadata- and minimally logged-levels by switching the old-data partition to staging table truncating it afterwards. This helps to avoid log-intensive DELETE operations and reduce blocking in the system.

Let’s look at implementation. First, I would create partition function and scheme considering that now is November 2017 and we would need to retain 12-month of data starting November 2016.

create partition function pfOrders(datetime2(0))
as range right for values
('2016-11-01','2016-12-01','2017-01-01','2017-02-01'
,'2017-03-01','2017-04-01','2017-05-01','2017-06-01'
,'2017-07-01','2017-08-01','2017-09-01','2017-10-01'
,'2017-11-01','2017-12-01','2018-01-01');

create partition scheme psOrders 
as partition pfOrders
all to ([Primary]);

This code will create 16 partitions. The left-most partition will host the data prior 2016-11-01 and it will be empty. The two right-most partitions will host the data for December 2017 and everything starting on 2018-01-01. They also will be empty at this point.

There is the simple reason why we want to have two right-most partitions empty. Let’s assume that we will run the monthly purge process in December and December’s partition will already store some data. As part of the purge process, we would like to create the new partition for the “next month” data. It is beneficial to perform this and split partition function on empty partition. With B-Tree tables, it is nice to have implementation. It allows to avoid any data scans and movements reducing the time for schema modification lock being held. For columnstore indexes, this is actually the must have part of design – you would be unable to split non-empty partition at all.

If you ever implemented Sliding Window pattern with B-Tree indexes, you would be aware of empty right-most partition. However, you might notice that in our example, there is also empty left-most partition present. As I already mentioned, columnstore indexes would not allow you to merge non-empty partitions and you need to have an extra empty partition to perform the merge after old data is purged.

Let’s look at the process in details. As the first step, I will create two tables that will share the partition function and scheme. We will populate them with some data and create the columnstore indexes on the tables.

create table dbo.Orders
(
	OrderDate datetime2(0) not null,
	OrderId int not null,
	Placeholder char(100),
)
on psOrders(OrderDate);

create table dbo.OrderLineItems
(
	OrderDate datetime2(0) not null,
	OrderId int not null,
	OrderLineItemId int not null,
	Placeholder char(100),
)
on psOrders(OrderDate);

-- Left-most and right-most are empty
;with N1(C) as (select 0 union all select 0) -- 2 rows
,N2(C) as (select 0 from N1 as t1 cross join N1 as t2) -- 4 rows
,N3(C) as (select 0 from N2 as t1 cross join N2 as t2) -- 16 rows
,N4(C) as (select 0 from N3 as t1 cross join N3 as t2) -- 256 rows
,N5(C) as (select 0 from N4 as t1 cross join N4 as t2) -- 65,536 rows
,Ids(Id) as (select row_number() over (order by (select null)) from N5)
insert into dbo.Orders(OrderDate, OrderId)
	select dateadd(day,Id % 390,'2016-11-01'), ID
	from Ids;

insert into dbo.OrderLineItems(OrderDate,OrderId, OrderLineItemId)
	select OrderDate, OrderId, OrderId
	from dbo.Orders;

create clustered columnstore index CCI_Orders on dbo.Orders
on psOrders(OrderDate);

create clustered columnstore index CCI_OrderLineItems on dbo.OrderLineItems
on psOrders(OrderDate);

The next listing returns data distribution and allocation information for dbo.Orders table.

select 
	t.object_id, i.index_id, i.name as [Index], p.partition_number,
	p.[Rows], p.data_compression_desc, 
	fg.name as [Filegroup],
	sum(a.total_pages) as TotalPages, 
	sum(a.used_pages) as UsedPages, 
	sum(a.data_pages) as DataPages,
	sum(a.total_pages) * 8 as TotalSpaceKB, 
	sum(a.used_pages) * 8 as UsedSpaceKB, 
	sum(a.data_pages) * 8 as DataSpaceKB
from 
	sys.tables t with (nolock) join sys.indexes i with (nolock) on
		t.object_id = i.object_id
	join sys.partitions p with (nolock) on 
		i.object_id = p.object_id AND i.index_id = p.index_id
	join sys.allocation_units a with (nolock) on 
		p.partition_id = a.container_id
	join sys.filegroups fg with (nolock) on 
		a.data_space_id = fg.data_space_id
where
	t.object_id = object_id(N'dbo.Orders')
group by
	t.object_id, i.index_id, i.name, p.partition_number,
	p.[Rows], p.data_compression_desc, fg.name
order by 
	i.index_id, p.partition_number;

Figure 1 illustrates the output of the listing. As you can see, data is distributed across 13 partitions with left-most and two right-most partitions empty.

01. Data Distribution And Allocation Information

Let’s try to split non-empty partition, just for the demo purposes

alter partition scheme psOrders next used [Primary];

alter partition function pfOrders()
split range ('2017-11-15');

As expected, it would not work with the error message shown below.

02.Split Non-Empty Partition

The merge of non-empty partition would also fail.

03.Merge Non-Empty Partition

Fortunately, we can split an empty partition. Again, let’s assume that we want to start purging process in December.  I would insert a couple rows to December’s partitions making them non-empty.

insert into dbo.Orders(OrderDate, OrderId) values('2017-12-02',100000);
insert into dbo.OrderLineItems(OrderDate,OrderId, OrderLineItemId) values('2017-12-02',100000,100000);

Let’s create another empty partition by splitting partition function. The right-most partition is still empty and operation would succeed. As result, we will have separate empty partitions for January, 2018 and another partition that will store all data starting 2018-02-01. We will split the right-most empty partition again during our January’s 2018 purge process.

alter partition scheme psOrders next used [Primary];

alter partition function pfOrders()
split range ('2018-02-01');

The process of purging old data would consist of several steps. First, we need to create the staging tables to which we will switch old November 2016 partitions. Those tables need to be empty, have exactly the same schema with the main tables and reside on the same filegroup.

create table dbo.OrdersTmp
(
	OrderDate datetime2(0) not null,
	OrderId int not null,
	Placeholder char(100),
) on [Primary];

create clustered columnstore index CCI_OrdersTmp on dbo.OrdersTmp
on [Primary];

create table dbo.OrderLineItemsTmp
(
	OrderDate datetime2(0) not null,
	OrderId int not null,
	OrderLineItemId int not null,
	Placeholder char(100),
)
on [Primary];

create clustered columnstore index CCI_OrderLineItemsTmp on dbo.OrderLineItemsTmp
on [Primary];

After tables were created, we can switch November 2016 partitions there truncating staging tables afterwards. Remember that in the main tables, November 2016 is the second left-most partition.

alter table dbo.Orders switch partition 2 
to dbo.OrdersTmp;

alter table dbo.OrderLineItems switch partition 2 
to dbo.OrderLineItemsTmp;

truncate table dbo.OrdersTmp;
truncate table dbo.OrderLineItemsTmp;

If you look at dbo.Orders allocation information again, you would see that two left-most partitions are now empty as shown in Figure 4

04. Data Distribution And Allocation Information After Purge

Now they can be merged, which will complete our implementation.

alter partition function pfOrders()
merge range('2016-11-01');

As you can see, implementation of Sliding Window pattern with columnstore indexes is very similar to B-Tree tables. The only differences are:

  • You must have empty right-most partition pre-allocated to perform the split. I’d like to reiterate that even though it is not required with B-Tree indexes, such empty partition would reduce I/O overhead and table locking during split operation there.
  • You must have another empty left-most partition to perform the merge. This is not required nor needed with B-Tree indexes.

I’d like to thank Ned Otter (blog) for his suggestions and feedback. They convinced me to blog on the subject.

Source code is available for download.

Next (2017-11-29): Splitting and Merging Non-Empty Partitions in Columnstore Indexes

How To Move Data and Log Files To Different Drives Keeping the Database Online in Non-Enterprise Editions of SQL Server

We, SQL Server professionals, like Enterprise Edition. It has many bells and whistles that make our life easier and less stressful. We wish to have Enterprise Edition installed on every server. Unfortunately, customers do not always share our opinions – they want to save money. More often than not, they choose to go with the Standard Edition, which is significantly less expensive.

From performance standpoint, Standard Edition would suffice in many cases. Even though it lacks several nice features, it would work just fine even in large and busy systems. I dealt with many multi-TB installations that handled thousands transactions per second using Standard Edition of SQL Server.

Nevertheless, Standard edition lacks many of availability features offered in Enterprise Edition. Most important is index management. You cannot rebuild indexes keeping the table online. There are some tricks that can help reducing index rebuild time; however, it would not help much with the large tables.

This limitation has another interesting implication. In Standard Edition you cannot rebuild the indexes moving data to another filegroup transparently to the users. One of the cases when such an ability is very important is changing the database disk layout when you are upgrading disk subsystem. Obviously, it is very easy to do offline – this is just the matter of copying database files. However, even with the fast disk subsystem, that can take hours in multi-TB databases, which could violate your availability SLA.

This is especially critical with the Cloud installations where I/O subsystem is usually the biggest bottleneck due to the bad I/O performance. The situation, however, is starting to change. Both, Microsoft Azure and Amazon AWS now offer fast SSD-based I/O solutions for very reasonable price. Unfortunately, the old installations were usually deployed to the old and slow disks and upgrading to the new drives will often lead to the hours of the downtime.

Fortunately, you can move data to the different disk arrays almost transparently to the users even in non-Enterprise Editions of SQL Servers. There are two ways how to accomplish it. The first one is very simple and can be done if system uses database mirroring. It requires failovers and secondary server downtime, which could lead to the data loss in case of disaster.

The second approach works without the mirroring. It is slow, it generates large amount of transaction log records, it introduces huge index fragmentation; however, it keeps database online most of the time. There is still the downtime involved; although, it could be limited to just a few minutes. It will work in any SQL Server version and edition – well, to be frank, I have not tried it in SQL Server 2000 yet.

Let’s look at both of those approaches in details.

Moving database files with mirroring Involved

Database mirroring and, as matter of fact, Always On Availability Groups rely on the stream of transaction log records. Secondary servers apply the changes in the data files using file and page IDs as the reference. With exception of database file-related operations, for example file creation, primary and secondary servers do not need to store database files in the same location – it is possible to use different disk and folder structure on the servers.

You can rely on this behavior if you need to move database files to the different drives. You can run ALTER DATABASE MODIFY FILE(FILENAME=..) command on the secondary server, which will allow you to update data and log files paths in the system catalogs. Everything will continue run normally – those changes would not take place until the next database restart.

Unfortunately, you cannot take database that participate in the mirroring session offline and you need to shut down entire instance of SQL Server. After that, you can physically move database files to the new location. On the primary server, the database mirroring will switch to the DISCONNECTED state. The database will continue to be available to the clients; however, it remains unprotected – all changes will be lost in case of disaster. You need to remember that file copy operation can take hours and you need to evaluate if you can take such a risk. It is also worth to mention that transaction log on the primary would not truncate and continue to grow even after log backups – SQL Server needs to retain the log records until they sent to the secondary server.

After the file copy operation is completed, you can start the instance (the primary database will switch to SYNCHRONIZING state) and wait until all log records have been transmitted to the secondary (SYNCHRONIZED state). Then, you can failover and wash, rinse and repeat the process on the former primary server.

To summarize, this process is very simple and transparent to the client applications. It is the good choice as long as you can afford the instance downtime and possibility of  data loss in case of disaster. If this is not the case, you will have to use much more complicated approach.

When mirroring is not an option..

.. our life is much more complicated and the process will require multiple steps to complete.

  1. We need to create the new data files in the secondary filegroups and shrink existing files by using DBCC SHRINKFILE(EMPTYFILE) command. This will move data from old to the new data files.
  2. Next, we need to repeat the same process with the primary filegroup. You cannot remove primary MDF file from the database; although, you can make it very small and move all data from there.
  3. Next, we need to shrink the transaction log .
  4. Finally, we need to copy MDF and LDF files to the new location. This is offline operation; however, both, MDF and LDF data files are small at this point and downtime is minimal.

Let’s look at the process in details. As the first step, let’s create the test database with two filegroups and populate it with some data. For the demo purposes, I am assuming that C:\OldDrive folder represents old and C:\NewDrive – new disk arrays respectively.

create database DataMovementDemo
on primary
( name = N'DataMovementDemo', filename = N'C:\OldDrive\DataMovementDemo.mdf', size = 100MB, filegrowth = 50MB),
filegroup [Secondary]
( name = N'DataMovementDemo_Secondary1', filename = N'C:\OldDrive\DataMovementDemo_Secondary1.ndf', size = 100MB, filegrowth = 50MB),
( name = N'DataMovementDemo_Secondary2', filename = N'C:\OldDrive\DataMovementDemo_Secondary2.ndf', size = 100MB, filegrowth = 50MB)
log on
( name = N'DataMovementDemo_log', filename = N'C:\OldDrive\DataMovementDemo_log.ldf', size = 500MB, filegrowth = 500MB)
Go

alter database DataMovementDemo set recovery full
go

use DataMovementDemo
go

create table dbo.DataOnPrimary
(
    ID int not null,
    Placeholder char(8000),
    constraint PK_DataOnPrimary
    primary key clustered(ID)
    on [Primary]
);

create table dbo.DataOnSecondary
(
    ID int not null,
    Placeholder char(8000),
    constraint PK_DataOnSecondary
    primary key clustered(ID)
    on [Secondary]
);

;with N1(C) as (select 0 union all select 0) -- 2 rows
,N2(C) as (select 0 from N1 as T1 cross join N1 as T2) -- 4 rows
,N3(C) as (select 0 from N2 as T1 cross join N2 as T2) -- 16 rows
,N4(C) as (select 0 from N3 as T1 cross join N3 as T2) -- 256 rows
,N5(C) as (select 0 from N4 as T1 cross join N4 as T2 ) -- 65,536 rows
,Nums(Num) as (select row_number() over (order by (select null)) from N5)
    insert into dbo.DataOnPrimary(ID)
        select Num from Nums;

insert into dbo.DataOnSecondary(ID)
    select ID from dbo.DataOnPrimary;

We can check the size of the data and log files along with their free space with the code below.

select 
    f.name as [FileName]
    ,fg.name as [FileGroup]
    ,f.physical_name as [Path]
    ,f.size / 128.0 as [CurrentSizeMB]
    ,convert(int,fileproperty(f.name,'SpaceUsed')) / 
        128.0 as [UsedSpaceMB]
    ,f.size / 128.0 - convert(int,fileproperty(f.name,'SpaceUsed')) / 
        128.0 as [FreeSpaceMb]
from 
    sys.database_files f left join sys.filegroups fg on 
        f.data_space_id = fg.data_space_id;

Figure 1 shows the output of the statement.

01. Database file stats after database creation

Moving data files from secondary filegroups

As the first step, you need to create new data files on the target drive. You can keep the same number of files as before, or use this as the opportunity to change the filegroup layout. In general, the number of files in the fielgroup greatly depends on the volatility of the data. Every data file has its own set of allocation map pages, which reduces the contention during page and extent allocations. It is impossible to give the general advice on how many files to create – I usually start with four files per filegroup unless the data is extremely volatile and the filegroup handles hundreds or even thousands of inserts per second. You can monitor and analyze PAGELATCH waits to see if there is the contention and adjust the number of the files accordingly.

In our example, let’s create two data files on C:\NewDrive folder as shown below. Make sure that both files have exactly the same initial size and autogrowth parameters specified in MB. This will help SQL Server to evenly distribute data between them.

alter database DataMovementDemo add file 
( name = N'DataMovementDemo_NewSecondary1', filename = N'C:\NewDrive\DataMovementDemo_NewSecondary1.ndf', size = 250MB, filegrowth = 50MB )
to filegroup [Secondary];

alter database DataMovementDemo add file 
( name = N'DataMovementDemo_NewSecondary2', filename = N'C:\NewDrive\DataMovementDemo_NewSecondary2.ndf', size = 250MB, filegrowth = 50MB )
to filegroup [Secondary];

Figure 2 shows the output from the Listing 2 after new files were created.

02. File stats after new files has been created

The DBCC SHIRINKFILE command works in a very simple manner. It reads allocated extents from the end of the file and moves them to the other files in the filegroup. In case, if  filegroup has multiple files, SQL Server uses proportional fill algorithm choosing to which file those extents need to be moved. The choice depends on amount of free space in the file – more space file has, more data would be copied there.

In case, when the filegroup originally has more than one file, you would like to avoid an overhead of moving data to the file, which yet to be moved. In our case, you want the data from DataMovementDemo_Secondary1 file to be distributed only between DataMovementDemo_NewSecondary1 and DataMovementDemo_NewSecondary2 files avoiding any inserts into DataMovementDemo_Secondary2 file.

Usually, data files in production databases do not have excessive amount of free space. When this is the case, you can simply prevent unnecessary data movements by restricting auto-growth of the old files. However, if those files have large amount of free space, you can also consider to shrink them and release this space first. There is the catch though. If free space is located in the beginning of the data file, shrink operation would start data movement and introduce the overhead. You need to make decision how to proceed on case by case basis.

The next listing shows how you can restrict the auto-growth for the file.

declare
    @MaxFileSizeMB int
    ,@SQL nvarchar(max)
	
-- Obtaining current file size 	
select @MaxFileSizeMB = size / 128 + 1
from sys.database_files
where name = 'DataMovementDemo_Secondary2';

set @SQL = N'alter database DataMovementDemo 
modify file(name=N''DataMovementDemo_Secondary2'',maxsize=' + 
    convert(nvarchar(32),@MaxFileSizeMB) + N'MB);';

exec sp_executesql @SQL;

Now we are ready to process the first data file. Listing below shows the code that performs data movement and removes an empty file from the filegroup afterwards. Both operations are transparent to the users and client applications. It is worth mentioning that you can use the code from the second listing above to monitor the progress of the operation. You can also look at percent_complete column in sys.dm_exec_requests view.

dbcc shrinkfile(DataMovementDemo_Secondary1, emptyfile);
alter database DataMovementDemo remove file DataMovementDemo_Secondary1;

If you checked the status of the files after operation is completed, you would see the results as shown in Figure 3. As you see, the data from the data file has been distributed between other files in the filegroup.

03. File stats after the first file has been processed

You can use exactly the same approach to move data from the DataMovementDemo_Secondary2 file. Listing shows the code and Figure 4 shows the database files after the process is completed. As you see, the secondary filegroup now resides on the new drive.

dbcc shrinkfile(DataMovementDemo_Secondary2, emptyfile);
alter database DataMovementDemo remove file DataMovementDemo_Secondary2;

04. File stats after the second file movement

The word of caution. As I already mentioned, DBCC SHRINKFILE  generates enormous amount of transaction log records. Make sure that transaction log is truncating especially if the database uses FULL recovery model.

Moving primary data file

Even though many of us know about the best practice of keeping PRIMARY filegroup empty, it rarely followed. Majority of production databases keep the data in PRIMARY filegroup, which usually consist of the single MDF file.

Unfortunately, you cannot remove nor change the primary data file in the database. Moreover, you cannot shrink the file below the size of the data currently stored in the file, even if a filegroup has the other data files.

Fortunately, you can still use DBCC SHRINKFILE(EMPTYFILE) command on MDF data file. It would move data to the other files in the filegroup and failing on the final stage of the execution with the error message shown in Figure 5. Nevertheless, the majority of the data from the MDF data file would be moved to the other files.

05. DBCC SHRINKFILE(EMPTYFILE) error on the primary data file

Listing below shows the code that performs this action. It creates the second data file in PRIMARY filegroup and moves the data from MDF file there. Figure 6 shows the file stats after it is completed – after DBCC SHRINKFILE(EMPTYFILE) error.

alter database DataMovementDemo add file 
( name = N'DataMovementDemo_Primary2', filename = N'C:\NewDrive\DataMovementDemo_Primary2.ndf', size = 550MB, filegrowth = 50MB )
to filegroup [Primary];
go

-- It will error in the end
dbcc shrinkfile(DataMovementDemo, emptyfile);

06.File stats after DBCC SHRINKFILE(EMPTYFILE) error

As you see, MDF data file is pretty much empty. You can release the empty space from the file using DBCC SHRINKFILE(DataMovementDemo, 10) command. Figure 7 illustrates the situation after it is completed and MDF file became very small.

07. File stats after removal free space from MDF file

Unfortunately, this approach introduces two or more unevenly sized data files in the PRIMARY filegroup, which makes proportional fill algorithm less efficient. It may or may not be a problem in your system, depending on how volatile is the data. You can address it after you move MDF file to the new drive by creating other data files in PRIMARY filegroup and shrinking and emptying the file you just created. This will distribute the data in all files in the filegroup evenly.

Finally, it is worth mentioning that in some cases, especially when MDF file is very large, DBCC SHRINKFILE(EMPTYFILE) command can error in the middle of the execution stating that it cannot move some of the data pages that belong to the system objects. You can address it by re-running DBCC SHRINKFILE using the current data size as the target (e.g. releasing the empty space from the file). This will move those data pages within the file and you can re-run DBCC SHRINKFILE(EMPTYFILE) command afterwards.

Shrinking transaction log

The decision how to handle transaction log depends on its size, and backup and high availability strategies you have in place. Transaction log size affects time, which file copy operation will require and, therefore, the system downtime. Obviously, the simplest solution is avoid shrinking transaction log if the log file is not very large and downtime is acceptable.

In case, if you need to reduce the downtime, there are no options but shrinking the log file. It is usually not a problem in case if database uses the SIMPLE recovery model. However, with FULL recovery model situation is a bit more complicated.

As the first step in this process, you need to truncate the log by performing the log backup. This operation does not decrease the size of the log file but rather reduce the size of the active/used portion of the log. Keep in mind that open transactions, backlogs in high availability log record queues and a few others factors can prevent transaction log from being truncated.

Next, you can shrink the log file using DBCC SHRINKFILE command with the very small size- 50MB, for example- as the target. Your results may vary. Internally, SQL Server splits the log to the multiple blocks called Virtual Log Files and re-uses them in the circular matter. Shrink operation would release the empty space from the tail of the log; however, the resulting file size depends on the active VLF offsets in the file.  It is entirely possible that shrink command would not reduce the file size if active VLFs are close to the end of the file.

Let’s illustrate that with the example and run DBCC LOGINFO command, which shows the status of the VLFs in the log file. Figure 8 illustrates the partial output from our test database. Status value of 2 indicates that VLF is active and cannot be truncated. As you can see, it is in the middle of the file.

08. DBCC LOGINFO output

As you saw in Figure 7, the log file is using just 61MB out of 1.5GB in the file. However, if you run DBCC SHRINKFILE(DataMovementDemo_Log, 65) command, you’d see that it did not shrink beyond 1000MB as shown in Figure 9.

09. File stats after shrinking transaction log

If you run DBCC LOGINFO again, you would see that SQL Server removed the empty VLFs from the end of the file and stopped when it reached the active VLF there. Figure 10 illustrates that. It is also worth mentioning that the first VLF in the file also became active during the shrink.

10. DBCC LOGINFO output after shrinking transaction log

At this point you have the two options, assuming that size of the log file is still unacceptable. You can wait until SQL Server truncates the log making last VLF inactive and repeat the shrink operation afterwards. This will eventually happen with the regular workflow. You can even force this by generating transaction log records by creating the table with one CHAR(8000) column and inserting multiple rows there in the separate transactions and batches. Do not forget to force log truncation with BACKUP LOG operations and use DBCC LOGINFO to monitor the progress.

Alternative option is switching database to the SIMPLE recovery model using ALTER DATABASE SET RECOVERY SIMPLE command. This will perform log truncation and will allow you to shrink the log to the minimal size immediately. Obviously, this approach will require you to disable transaction log-based high availability technologies and recreate backup chain afterwards.

While, on the surface, switching database to SIMPLE recovery model introduces unnecessary complications, it could be the good opportunity to rebuild transaction log file. Large number of VLFs negatively affect system performance and can slow down database recovery time. Unfortunately, default settings in New Database dialog in Management Studio leads to that situation. At least in SQL Server prior 2016.

You can rebuild transaction log after you moved the file to the new drive by manually growing it in 4000MB chunks – do not use 4GB chunks due to the bug in some of SQL Server versions. Every chunk will generate 16 250MB VLF files, which works well for the most configurations.  After that, change log auto-growth to be in MB – I found that 1000MB chunks are good for majority of the cases.

Moving MDF and LOG files to the new drive

Finally, it is the time to move MDF and LDF files to the new drive. Unfortunately, it is offline operation. Fortunately, at this point, both files should be very small and downtime should be minimal.

As the first step, you need to change location of the files using ALTER DATABASE MODIFY FILE command. This will change location of the files in the system catalogs, and will take an effect after the database restart.

Next, you can take database offline using ALTER DATABASE .. SET OFFLINE WITH ROLLBACK IMMEDIATE command. This will disconnect all users from the database rolling back the active transactions. You can copy the files and take database back online using ALTER DATABASE .. SET ONLINE command as shown below.

use master
go

alter database DataMovementDemo modify file
( name = N'DataMovementDemo', filename = N'C:\NewDrive\DataMovementDemo.mdf');
alter database DataMovementDemo modify file
( name = N'DataMovementDemo_Log', filename = N'C:\NewDrive\DataMovementDemo_Log.ldf');
go

alter database DataMovementDemo set offline with rollback immediate
go

-- COPY FILES 

alter database DataMovementDemo set online;

As you see in Figure 11 – our database is now residing on the new drive.

11. Final file layout

Almost done! Again, do not forget to rebuild the log file and switch database to FULL recovery model if needed.

Dealing with index fragmentation

There is one final step though. As you already know, DBCC SHRINKFILE command works on the extent level. It moves allocated extents from the end of the file to the new place without any considerations to which objects those extents belong. As you can guess, this leads to the huge index fragmentation, which you need to address at the final stage of the process.

Obviously, you do not want to acquire Schema Modification (SCH-M) locks blocking access to the tables during index rebuild operations. It makes index reorg the better choice for this scenario – it is online in any edition of SQL Server.

Listing below shows the script you can use to generate ALTER INDEX REORG commands for every clustered and nonclustered indexes from specific filegroup. It returns result as XML string – you can simply cut and paste it and run as another batch.

;with FGObjects(SchemaName, TableName, IndexName, RowNum, Cnt)
as
(
    select 
        s.Name, t.Name, i.Name
        ,ROW_NUMBER() over(order by t.object_id, i.index_id) as RowNum
        ,COUNT(*) over() as Cnt
    from
        sys.indexes i join sys.filegroups f on
            i.data_space_id = f.data_space_id
        join sys.all_objects t on
            i.object_id = t.object_id
        join sys.schemas s on
            t.schema_id = s.schema_id
    where
        i.index_id >= 1 and
        t.type = 'U' and -- User Created Tables
        i.data_space_id = f.data_space_id and
        f.name = 'PRIMARY' -- Filegroup
)
select 
    'alter index ' as [text()]
    ,[IndexName] as [text()]
    ,' on ' + SchemaName + '.' as [text()]
    ,[TableName] as [text()]
    ,' reorganize;' + CHAR(13) + CHAR(10) as [text()]
    ,'raiserror(''' as [text()]
    ,RowNum as [text()]
    ,'/' as [text()]
    ,Cnt as [text()]
    ,' is done'',0,1) with nowait;' + CHAR(13) + CHAR(10) as [text()]
    ,'go' + CHAR(13) + CHAR(10) as [text()]
from FGObjects
for xml path('');

As you see, the process of moving database files between different drives could lead to significant amount of work if you want to minimize the downtime. However, it is often the only choice, especially in the Cloud environment where you can get significant performance benefits by utilizing new SSD-based drives. Go for it! 🙂

Source code is available for download.

Size does matter: 10 ways to reduce the database size and improve performance in SQL Server

As the database professional, I like multi-terabyte databases. They are fun to deal with; they give you priceless experience and look cool in your resume. Last but not least, customers with multi-terabyte databases do not have problems with multi-kilodollar invoices. Customers usually understand amount of work involved in such projects.

The problem, however, is that the large databases are not good for the customers. Those databases are more expensive to support and maintain. You need to have highly skilled professionals in the team. Professionals, who can design nontrivial solutions in all areas – architecture, availability, maintenance, performance tuning, to name just a few.

Large databases usually require powerful hardware to run. There is, of course, very subtle difference between the size of the database and size of the active (hot) data. It is entirely possible that applications deal only with the fraction of the data stored in the database and, therefore, even mediocre server can handle the load. However, on the bare minimum, there is always the storage cost.

The projects when you have to reduce the size of the databases are very common. Even though size reduction is rarely the primary objectives of such projects, reducing the size often helps to achieve other goals. Think about designing Disaster Recovery (DR) strategy. Plenty of things that can help to meet strict RTO requirements and smaller database size definitely helps.

Today, I am going to discuss several methods that can help in reducing database size. Some of them are fully transparent to the client applications; others require regression testing and/or code refactoring. I would also focus on the data files only – troubleshooting and reducing transaction log size is the different topic.

0. Find the worst offenders

In the nutshell, the database files are just the containers for the data. Some space in the data files is allocated and used by the database objects; however, there is usually some unallocated space. For example, if you created the database with one 1GB data file, you would have 1 GB file on disk. However, immediately after creation, it would have just a handful of the data pages allocated inside the file and most part of the file would be free (unallocated).

It is completely normal to have free space in the data files, especially if amount of data is constantly growing. However, excessive amount of the free space could consume unnecessary space on the disks. The script below helps you to analyze amount of allocated and unallocated space on per-database file basis.

select 
    f.type_desc as [Type]
    ,f.name as [FileName]
    ,fg.name as [FileGroup]
    ,f.physical_name as [Path]
    ,f.size / 128.0 as [CurrentSizeMB]
    ,f.size / 128.0 - convert(int,fileproperty(f.name,'SpaceUsed')) / 
        128.0 as [FreeSpaceMb]
from 
    sys.database_files f with (nolock) left outer join 
        sys.filegroups fg with (nolock) on
            f.data_space_id = fg.data_space_id
option (recompile)

Figure 1 illustrates the output of the script from one of the production servers. Even though the output shows significant amount of free space in the data files, it may or may not be a problem. The decision if that space needs to be deallocated depends on the other factors, such as data growth expectations, disk system configuration and a few others.

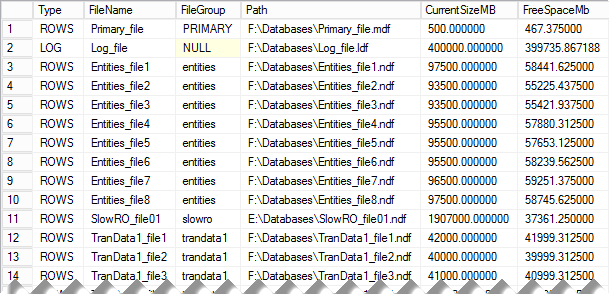
01. Allocated and Free space in the database files

We will talk how to handle the situations when free space needs to be deallocated later, for now, let’s focus on the data, and discuss what we can do to reduce its size.

All of us are familiar with Pareto principle, which is also known as 80/20 rule. To simplify, in most projects, you can achieve 80% of improvements by spending 20% of time or resources. That ratio is even more severe when we search for the most space consuming objects in the database. Even with very large databases, usually the most part of the space is consumed by just a handful of tables. Obviously, we would like to focus on them – at least at the beginning of the process.

Let’s do one step backwards, however, and remember how SQL Server stores the data. Every on-disk table has the main copy of the data, which stored either in the clustered index or in heap. In addition, every table can have the set of nonclustered indexes that store the copy of the data for some of columns and reference the main copy of the rows (in the clustered index or heap). For the purpose of this discussion, let’s talk about generic indexes without any further differentiation between their types.

Every index consists of the data pages that can store the data that belong to the different allocation units. IN_ROW allocation unit contains main data rows, which includes internal row structures, fixed-length column data and variable-length column data that fits in IN_ROW data page. LOB allocation unit contains data for variable-length column data (including data types such as XML, CLR UDT, etc)that is greater than 8,000 bytes in size. Finally, ROW_OVERFLOW allocation unit contains data for variable-length column data that does not exceed 8,000 bytes but does not fit IN_ROW.

For example, if you created the table of the following structure and inserted one row there as it is shown below, you would have data for column C5 stored in LOB allocation units, data for one of either C3 or C4 columns stored in ROW_OVERFLOW allocation unit and data for all other columns stored in IN_ROW allocation unit. It is also worth mentioning that main row data in IN_ROW data would have the pointers to the data stored in the other allocation unit.

create table dbo.T1
(
    C1 int,
    C2 datetime,
    C3 varchar(5000),
    C4 varchar(5000),
    C5 varchar(max)
);

insert into dbo.T1(C1, C2, C3, C4, C5)
values
(
    1 /* C1 */
    ,GetUtcDate() /* C2 */
    ,Replicate('A',5000) /* C3 */
    ,Replicate('B',5000) /* C4 */
    ,Replicate(convert(varchar(max),'A'),10000) /* C5 */
)

You can read more about row structure and allocation units here: http://aboutsqlserver.com/storage-engine/

The script below provides you the information about space allocation on per-index basis in the database. You can easily modify it to aggregate on per-table basis or drill-down on per-allocation unit basis; however, at that stage I usually prefer to work on the index level.

;with SpaceInfo(ObjectId, IndexId, TableName, IndexName
    ,Rows, TotalSpaceMB, UsedSpaceMB)
as
( 
    select  
        t.object_id as [ObjectId]
        ,i.index_id as [IndexId]
        ,s.name + '.' + t.Name as [TableName]
        ,i.name as [Index Name]
        ,sum(p.[Rows]) as [Rows]
        ,sum(au.total_pages) * 8 / 1024 as [Total Space MB]
        ,sum(au.used_pages) * 8 / 1024 as [Used Space MB]
    from    
        sys.tables t with (nolock) join 
            sys.schemas s with (nolock) on 
                s.schema_id = t.schema_id
            join sys.indexes i with (nolock) on 
                t.object_id = i.object_id
            join sys.partitions p with (nolock) on 
                i.object_id = p.object_id and 
                i.index_id = p.index_id
            cross apply
            (
                select 
                    sum(a.total_pages) as total_pages
                    ,sum(a.used_pages) as used_pages
                from sys.allocation_units a with (nolock)
                where p.partition_id = a.container_id 
            ) au
    where   
        i.object_id > 255
    group by
        t.object_id, i.index_id, s.name, t.name, i.name
)
select 
    ObjectId, IndexId, TableName, IndexName
    ,Rows, TotalSpaceMB, UsedSpaceMB
    ,TotalSpaceMB - UsedSpaceMB as [ReservedSpaceMB]
from 
    SpaceInfo		
order by
    TotalSpaceMB desc
option (recompile)

Figure 2 shows the output of this script (table and index names are obscured). As you can see, this could quickly pinpoint the indexes that consume most part of the space in the database.

02. Indexes that consume the most space in the database

Now, let’s see what we can do to reduce their size.

1. Reducing Index Fragmentation

As you know, SQL Server stores on-disk table data on the 8KB data pages. Each data page contains data for one or multiple rows. With the exception of index creation or rebuild, SQL Server tries to populate pages in full during normal data modification operations. When data does not fit, for example, when the data pages does not have enough space to accommodate the new row, SQL Server performs the page split operation. In the nutshell, SQL Server allocates another data page and moves about half of the data from original to the new page, which frees up some space to accommodate the new row on the original data page.

Page split operations lead to the index fragmentation, which exists in two kinds. External fragmentation means that the logical order of the pages does not match their physical order, and/or logically subsequent pages are not located in the same or adjacent extents (extent is the group of 8 pages). Such fragmentation forces SQL Server to jump around reading the data from the disk, which makes read-ahead less efficient and increases the number of physical reads required. Moreover, it increases random disk I/O, which is far less efficient when compared to sequential I/O in the case of magnetic hard drives.

Internal fragmentation, on the other hand, means that data pages in the index have free space. As a result, the index uses more data pages to store data. It also increases the number of reads during query execution and amount of memory in buffer pool to cache index pages.

A small degree of internal fragmentation is not necessarily bad. It reduces page splits during insert and update operations when data is inserted into or updated from different parts of the index. Nonetheless, a large degree of internal fragmentation wastes index space and reduces the performance of the system. Moreover, for indexes with ever-increasing keys, for example on identity columns, internal fragmentation is not desirable because the data is always inserted at the end of the index.

You can monitor both, internal and external fragmentation with sys.dm_db_index_physical_stats DMV. Internal fragmentation can be monitored with avg_page_space_used_in_percent column. Lower value in the column indicates higher degree of internal fragmentation.

Let’s take a look at the example and analyze internal fragmentation of one of the indexes with the script below. For simplicity sake, I am using relatively small table; however, you would obviously like to focus on the largest indexes during the tuning process.

select 
    index_id, partition_number, alloc_unit_type_desc
    ,index_level, page_count, avg_page_space_used_in_percent
from 
    sys.dm_db_index_physical_stats
    (
        db_id() /*Database */
        ,object_id(N'dbo.MyTable') /* Table (Object_ID) */
        ,1 /* Index ID */
        ,null /* Partition ID – NULL – all partitions */
        ,'detailed' /* Mode */
    )

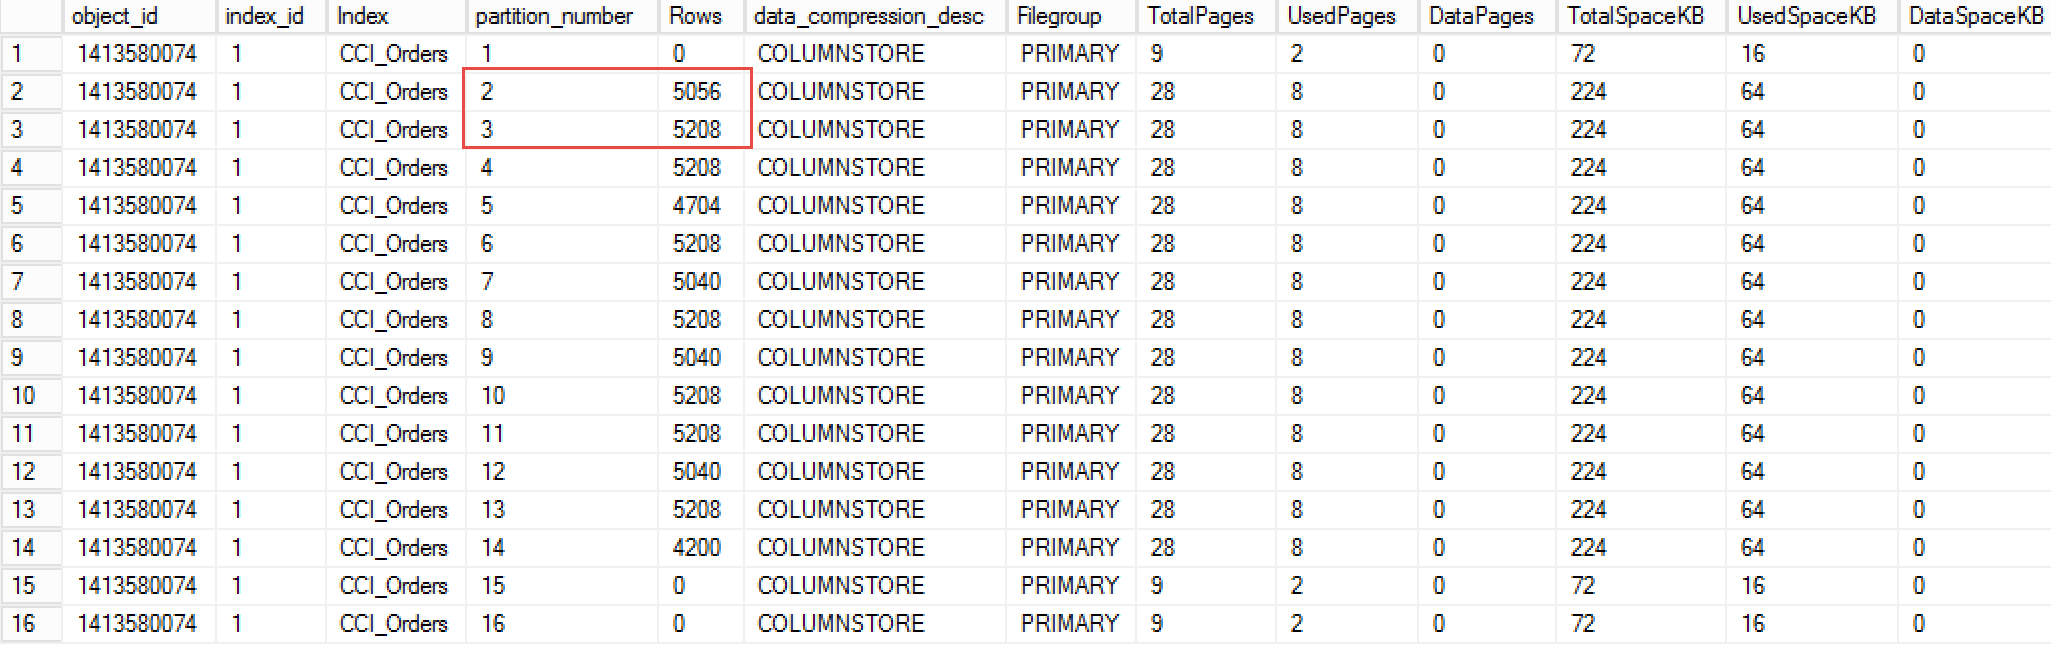
Figure 3 illustrates partial output of the script. The table is partitioned and, as result, you will see separate rows in the result – one per partition per allocation unit.

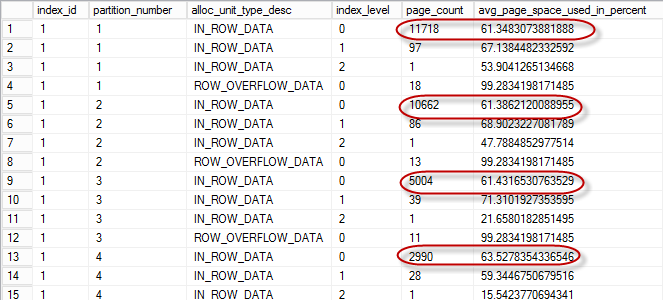
03. Internal Fragmentation in the Index

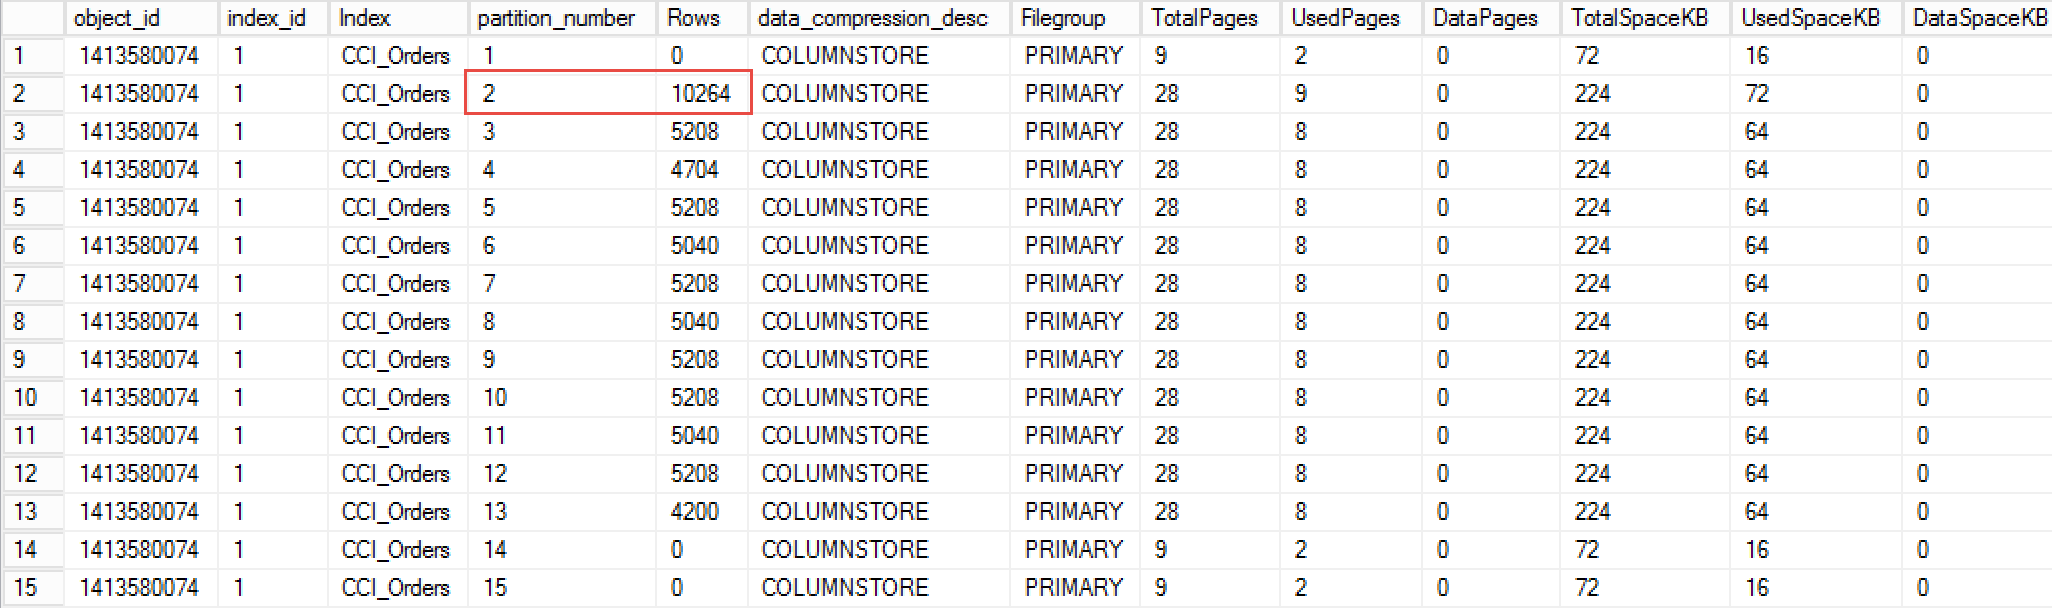
You can remove internal fragmentation by rebuilding the index. Figure 4 illustrates the output of sys.dm_db_index_physical_stats after the index rebuild with FILLFACTOR=100 (more on it later)

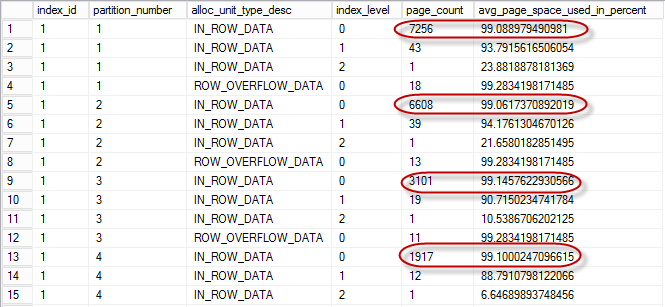
04. Internal Fragmentation after Index Rebuild

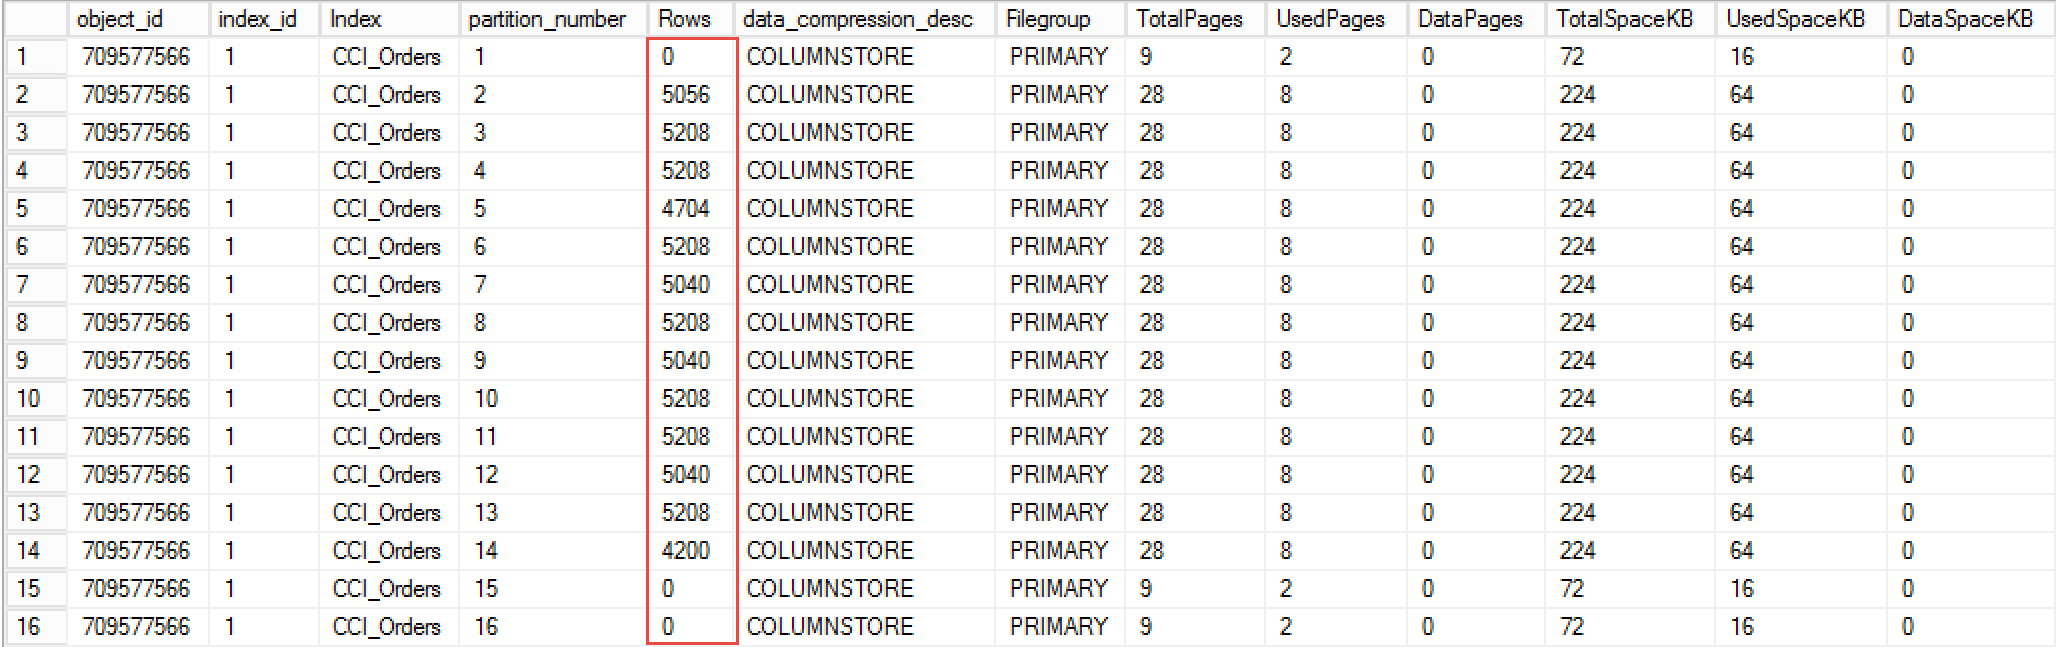
Figure 5 illustrates amount of space index used before (on the left side) and after (on the right side) rebuild. As you can see, index rebuild was able to free up more than 40% of the space index consumed before the rebuild.

05. Index Size before and after rebuild

FILLFACTOR parameter controls amount of free space SQL Server reserves on the pages during index creation and rebuild operation. For example, FILLFACTOR=80 forces SQL Server to make data pages about 80% full keeping 20% of the page space reserved. This could reduce the number of page splits and internal fragmentation when new rows are inserted to the middle of the index or updated in the way that increase their size. It is very important to remember that FILLFACTOR is applied only during index creation or rebuild stages. After index is created, SQL Server continue populates pages in full up to 100% performing page splits as needed.

As you can guess, the optimal solution would require fine-tuning FILLFACTOR and designing index maintenance strategy in the way that keeps internal fragmentation at minimum most part of the time. Unfortunately, there is no “one size fits all” advice in terms of FILLFACTOR. You should try to figure out the most optimal value by using different FILLFACTOR values and monitor how it would affect your fragmentation. You can start with FILLFACTOR value close to 100 and gradually decrease it by 5 until you find the sweet spot. Alternatively, you can monitor page splits in real time using transaction_log extended event tracking LOP_DELETE_SPLIT operation changing value based on amount of splits (you can see more on it at Jonathan Kehayias’ blog),

Lastly, you should remember than index rebuild creates another copy of the index during the process. In fact, it could increase the size of the data file on disk during the operation. Moreover, it generates large amount of transaction log records that could also affect transaction log size, network load and size of send and redo queues if database mirroring or AlwaysOn AG are in use.

2. Implementing Data Compression

If you are the lucky enough to have Enterprise Edition of SQL Server, you can reduce the size of the data by implementing Data Compression. There are two types of Data Compression supported in SQL Server – Row and Page.

Row compression addresses the storage inefficiency introduced by fixed-length data types. By default, in non-compressed row, size of the fixed-length data is based on the data type size. For example, INT column would always use 4 bytes, regardless of the value – even when it is NULL. Row compression addresses that and removes such an overhead. For example, INT value of 255 would use just 1 byte rather than 4 bytes.

Page compression goes one-step further and implements dictionary-based compression removing repetitive sequences of bytes on the page. I am not going to dive deep in the storage format of the compressed rows here and will follow up with additional blog post at some point. Alternatively, you can read about it in my book.

The actual results would greatly depend on the data and the schema. As you can guess, row compression would be beneficial when table has fixed-length data columns. More fixed-length columns you have, better the space savings are. Results of the page compression, on the other hand, depend on how repetitive is the data on the page. You can use sp_estimate_data_compression_savings system stored procedure to estimate compression results for your data. That procedure works by copying and compressing the sample of your data in tempdb measuring compression results.

It is also very important to remember that data compression works with IN_ROW allocation units only. It does not compress LOB nor ROW_OVERFLOW data.

Obviously, there is an overhead. Compression and decompression adds additional CPU load to the system. That overhead is relatively small for the ROW compression, especially when you read the data; however, for PAGE compression that overhead is more significant. There is the catch, though. While compression adds the load to CPU, it reduces I/O load in the system – SQL Server needs to issue less I/O operations due to the smaller data size. In the end, the queries could execute even faster especially on the systems that are not heavily CPU bound.

There is also the overhead during the batch operations. Batch inserts and updates could take more time when data is compressed. The same applies to the index maintenance. Just to give you some numbers, I ran a few tests at time when I worked on the book. I was using the data from one of the production tables with a decent number of fixed- and variable-length columns. Obviously, different table schema and data distribution will lead to slightly different results. However, in most cases, you would see similar patterns.

At the beginning of the tests, I have created three different heap tables and inserted one million rows into each of them. After that, I created clustered indexes with different compression settings and FILLFACTOR=100. This workflow led to zero index fragmentation and fully populated data pages.

During the first test, I ran SELECT statements to scan all of the clustered indexes accessing some row data. The second test updated every row in the tables, changing the value of the fixed-length column in a way that did not increase the row size. The third test inserted another batch of a million rows in the tables. Finally, I rebuilt all of the clustered indexes. You can see the execution statistics in Figure 5 below. All tests ran with warm cache with the data pages cached in the buffer pool. Cold cache could reduce the difference in execution times for the queries against compressed and non-compressed data, because queries against compressed data perform less physical I/O.

All statements were forced to run on a single CPU by using a MAXDOP 1 query hint. Using parallelism would decrease the query execution times, however it would add the overhead of parallelism management during query execution, which I wanted to avoid during the tests.

Figure 6 demonstrates the results of the tests.

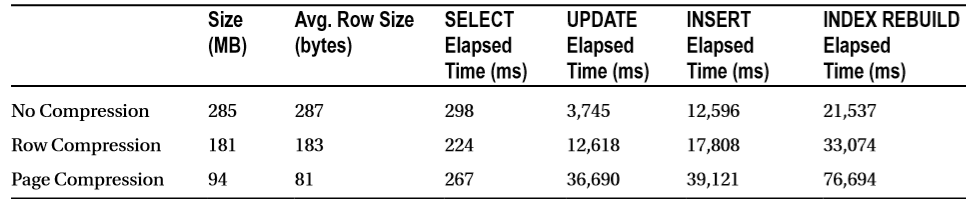
6. Data Compression – Storage Size and Performance

Obviously, it is impossible to provide generic advice how and when to compress the data. However, in case, if system is not heavily CPU bound, I would usually suggest implementing ROW compression on the indexes with volatile data. PAGE compression, on the other hand, could be the good choice for the old static data, especially when that data accessed infrequently.

It is also impossible to avoid mentioning data partitioning when we are discussing compression. It is very common to have the situation when just small subset of the data in the table is volatile. Unfortunately, you cannot apply different compression methods to hot and cold data unless the data is partitioned (either with table partitioning or with multiple tables utilizing partitioned views). Such partitioning helps you to implement different compression schemas to different table partitions (or tables) and will allow you to reduce index maintenance overhead by rebuilding the index on partition scope.

A word of caution, however. Partitioning is the great tool that can help you to address multiple challenges especially in database administration area. Even though, table partitioning can be implemented transparently to the client applications, it could introduce plan regressions. One of such examples is described here: http://aboutsqlserver.com/2012/07/10/cautionary-tale-about-triggers-version-store-and-fragmentation/. Make sure to carefully test your application if you decided to implement table partitioning.

Finally, if you are interested in data partitioning, I would like to reference my book again. The chapter on data partitioning is the largest one there and it discusses various examples and approaches of partitioning in various editions of SQL Server.

3. Removing unused indexes

It is often possible to reduce the size of the data during the index tuning process. The main goal of the index tuning is creating the right set of indexes, which also requires you to drop existing unused and redundant indexes. Keep in mind that you always need to carefully test your system when you change the indexes making sure that there is no plan regressions after the tuning.

There are two data management views that can help you to detect non-efficient indexes. The first one, sys.dm_db_index_usage_stats, shows you the statistics on the various index operations, such as index seek and scan, index updates and a few others, along with the time of the last operation. The second DMV, sys.dm_db_index_operational_stats, dives deeper and provides an information on I/O, access methods and locking statistics on the index.

The key difference between two DMOs is how they collect data. Sys.dm_db_index_usage_stats tracks how many times an operation appeared in the execution plan. Alternatively, sys.dm_db_index_operation_stats tracks operations at the row level. For example, if query execution plan includes Key Lookup operation and SQL Server ran it twice during query execution, sys.dm_db_index_usage_stats would track the single lookup operation, while sys.dm_index_operation_stats would track two of them.

You can obtain the information about index usage with sys.dm_db_index_usage_stats by running the statement below. You can use similar approach with sys.dm_db_index_operation_stats if you need more detailed analysis.

select 
    s.Name + N'.' + t.name as [Table]
    ,i.name as [Index] 
    ,i.is_unique as [IsUnique]
    ,ius.user_seeks as [Seeks], ius.user_scans as [Scans]
    ,ius.user_lookups as [Lookups]
    ,ius.user_seeks + ius.user_scans + ius.user_lookups as [Reads]
    ,ius.user_updates as [Updates], ius.last_user_seek as [Last Seek]
    ,ius.last_user_scan as [Last Scan], ius.last_user_lookup as [Last Lookup]
    ,ius.last_user_update as [Last Update]
from 
    sys.tables t with (nolock) join sys.indexes i with (nolock) on
        t.object_id = i.object_id
    join sys.schemas s with (nolock) on 
        t.schema_id = s.schema_id
    left outer join sys.dm_db_index_usage_stats ius on
        ius.database_id = db_id() and
        ius.object_id = i.object_id and 
        ius.index_id = i.index_id
order by
    s.name, t.name, i.index_id
option (recompile)

As you can see in the output in Figure 7, you can easily pinpoint the problematic indexes. Indexes in red ovals were not used in any queries for the duration of statistics collection. Those indexes consume space in the database. Moreover, they introduce update overhead in the system. As the side note, it is also beneficial to look at the indexes where update overhead exceeds their usefulness – for example, index in green oval is used only for scans even though it is constantly updated.

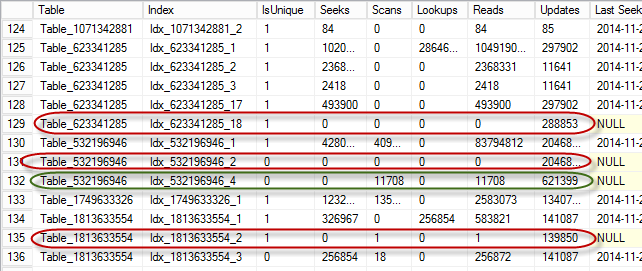
07. Index Usage Statistics

Obviously, you need to be careful making sure that you captured valid usage statistics. SQL Server does not persist statistics and it resets on restarts. Statistics is also cleared whenever the database is detached or shut down when the AUTO_CLOSE database property is on. Moreover, in SQL Server 2012 and 2014, statistics resets when the index is rebuilt.

You must keep this behavior in mind during index analysis. It is not uncommon to have indexes to support queries that execute on a given schedule. As an example, you can think about an index that supports a payroll process running on a bi-weekly or monthly basis. Index statistics information could indicate that the index has not been used for reads if SQL Server was recently restarted or, in the case of SQL Server 2012 and 2014, if index was recently rebuilt.

One of the ways to address statistics reset is collecting usage statistics based on some schedule and persists results in one of the tables in the database. This could help to catch the situations when index is required to support some of the rarely executed processes. As the side note, you can consider to recreate such indexes as part of the process dropping them when processes are completed.

You should also be careful with unique indexes. It is entirely possible that such indexes are created to support uniqueness constraints and removal of such indexes would violate business requirements for the system.

4. Removing Redundant Indexes

As you know, SQL Server can use composite index for an Index Seek operation as long as a query has a SARGable predicate on the leftmost query column. Ok, I know, it is confusing so let’s look at the example and create a table with clustered and two nonclustered indexes.

create table dbo.Employee
(
    EmployeeId int not null,
    LastName nvarchar(64) not null,
    FirstName nvarchar(64) not null,
    DateOfBirth date not null,
    Phone varchar(20) null,
    Picture varbinary(max) null
);
 
create unique clustered index IDX_Employee_EmployeeId 
on dbo.Employee(EmployeeId);
 
create nonclustered index IDX_Employee_LastName_FirstName
on dbo.Employee(LastName, FirstName);
 
create nonclustered index IDX_Employee_LastName
on dbo.Employee(LastName);

SQL Server can utilize IDX_Employe_LastName_FirstName index if query has the predicate on the LastName regardless of existence of the predicate on the FirstName. For example, both of the queries below would be able to use that index:

select EmployeeId, LastName, FirstName, DateOfBirth
from dbo.Employee
where LastName = @LastName and FirstName = @FirstName

select EmployeeId, LastName, FirstName, DateOfBirth
from dbo.Employee
where LastName = @LastName

Thus, the index IDX_Employee_LastName is redundant and can be dropped. There are, of course, always exceptions from the rule. IDX_Employee_LastName index stores less data and, therefore, it is more compact. If you have a process that constantly scan the index, smaller index size could be beneficial. However, those situations are very rare and usually update overhead of the extra index is not worth such small performance improvement on SELECT queries.

The script below shows you potentially redundant indexes by checking the indexes that have the same leftmost columns.

select
    s.Name + N'.' + t.name as [Table]
    ,i1.index_id as [Index1 ID], i1.name as [Index1 Name]
    ,dupIdx.index_id as [Index2 ID], dupIdx.name as [Index2 Name] 
    ,c.name as [Column]
from 
    sys.tables t join sys.indexes i1 on
        t.object_id = i1.object_id
    join sys.index_columns ic1 on
        ic1.object_id = i1.object_id and
        ic1.index_id = i1.index_id and 
        ic1.index_column_id = 1  
    join sys.columns c on
        c.object_id = ic1.object_id and
        c.column_id = ic1.column_id      
    join sys.schemas s on 
        t.schema_id = s.schema_id
    cross apply
    (
        select i2.index_id, i2.name
        from
            sys.indexes i2 join sys.index_columns ic2 on       
                ic2.object_id = i2.object_id and
                ic2.index_id = i2.index_id and 
                ic2.index_column_id = 1  
        where	
            i2.object_id = i1.object_id and 
            i2.index_id > i1.index_id and 
            ic2.column_id = ic1.column_id
    ) dupIdx     
order by
    s.name, t.name, i1.index_id

For example, for dbo.Employee table, script would provide the output shown in Figure 8.

08. Potentially Redundant Indexes

You can use such information for further analysis performing further index consolidation. In some cases, consolidation is trivial. For example, if a system has two indexes: IDX1(LastName, FirstName) include (Phone) and IDX2(LastName) include(DateOfBirth), you can consolidate them as IDX3(LastName, FirstName) include(DateOfBirth, Phone).

In the other cases, consolidation requires further analysis. For example, if a system has two indexes: IDX1(OrderDate, WarehouseId) and IDX2(OrderDate, OrderStatus), you have three options. You can consolidate it as IDX3(OrderDate, WarehouseId) include(OrderStatus) or as IDX4(OrderDate, OrderStatus) include(WarehouseId). Finally, you can leave both indexes in place. The decision primarily depends on the selectivity of the leftmost column and index usage statistics.

5. Implementing Filtered Indexes

Filtered indexes, introduced in SQL Server 2008, allowed you to index only a subset of the data and, therefore, reduce the index size. Consider a table with some data that needs to be processed as an example. This table can have a Processed bit column, which indicates the processing status as it is shown below.

create table dbo.Data
(
    RecId int not null,
    Processed bit not null,
    /* Other Columns */
)

Let’s assume that you have a backend process that loads unprocessed data based on the following query.

select top 1000 RecId, /* Other Columns */
from dbo.Data
where Processed = 0
order by RecId;

This query can benefit from the following index: CREATE NONCLUSTERED INDEX IDX_Data_Processed_RecId ON dbo.Data(Processed, RecId). Even though SQL Server rarely uses indexes on bit columns due to their low selectivity, such a scenario might be an exception if there are just a handful of unprocessed rows. SQL Server can use that index to select them; however, the index will never be used for selection of processed rows if a Key Lookup is required.

As a result, all index rows with a key value of Processed=1 would be useless. They will increase the index’s size, waste storage space, and introduce additional overhead during index maintenance.

Filtered indexes solve that problem by allowing you to index just unprocessed rows, making the index small and efficient as it is shown below.

create nonclustered index IDX_Data_Unprocessed_Filtered
on dbo.Data(RecId)
include(Processed)
where Processed = 0;

Obviously, there are several catches to remember. First, Query Optimizer has a design limitation, which can lead to suboptimal execution plans when columns from the filter are not present in leaf-level index rows. Always add all columns from the filter to the index, either as key or included columns. In our example, Processed column is added as an included column.

Second problem is filtered index statistics. SQL Server does not count the changes in the filtered columns towards statistics update threshold, which can lead to very inaccurate statistics. You should factor this behavior to statistics maintenance and, perhaps, update statistics manually on the regular basis.

Finally, SQL Server is very conservative when to use filtered indexes in case of plan caching. SQL Server would not generate and cache the plan with filtered index if there is the possibility that this plan would be invalid for some parameter values. For example, our filtered index would not be used for the case below:

select top 1000 RecId, /* Other Columns */
from dbo.Data
where Processed = @Processed
order by RecId;

As you can guess, auto-parameterization would make the matter worse. The bottom line, you should carefully test your system after implementing filtered indexes making sure that there is no plan regressions.

Finally, if you are using XML indexes in SQL Server 2012 and above, you can reduce their size (which, by the way, could be gigantic) by implementing Selective XML Indexes , which index just subset of the data. Pretty much the same approach with as filtered indexes.

6. Using Appropriate Data Types

All approaches we have already discussed could be implemented transparently to the client applications. Obviously, transparency here is very misleading – index tuning and partitioning require careful regression testing to be performed. However, all those changes are located in the database tier and you do not need to change any application code.

Now, it is the time to talk about several approaches that require such code changes. I would like to start with the general design principle that is often ignored during database design stage. The principle is simple – you should choose appropriate data types for the job.

Let’s consider the system that collects GPS location information from the multiple devices as the example. The main transaction entity in such system is Positions. One of the approaches to define such a table is the following (just a few columns from there):

create table dbo.Positions
(
    ATime datetime not null, -- 8 bytes 
    Latitude float not null, -- 8 bytes 
    Longitude float not null, -- 8 bytes 
    IsPrecise int not null,	-- 4 bytes
    IsAssistanceUsed int not null, -- 4 bytes
    -- Total: 32 bytes
    ...
)

Alternatively, you can define the same table a little bit differently:

(
    ATime datetime2(0) not null, -- 6 bytes 
    Latitude decimal(9,6) not null, -- 5 bytes 
    Longitude decimal(9,6) not null, -- 5 bytes 
    IsPrecise bit not null,	-- 1 bytes
    IsAssistanceUsed bit not null, -- 0 bytes
    -- Total: 17 bytes
    ...
)

As you see, even in the scope of those 6 columns you can save 15 bytes per row. It does not sound as significant saving; however, it quickly adds up as amount of data growth. For example, if such system collects 1M rows per day and stores it for a year, 15 bytes per row would become ~5.4GB of data on the leaf level of the index without counting any fragmentation overhead. And trust me, 1M positions per day is very small number for such systems.

While row compression can help to address some overhead, it would not help much when data types store excessive information. For example, row compression would cut an extra space from the boolean data stored in int columns; however, it would not help much with datetime in case if it has more precision that needed. Moreover, compression is the Enterprise Edition feature, which would not help you with the other editions.

One of the questions you should answer during database design stage is how precise the information should be. This could help you to choose correct data type for the column. As the example, consider the OrderDate column in Order Entry/Shopping cart system. Do you really need to store the time when order was placed with up to 3-millisecond precision provided by datetime column (8 bytes)? If this was not the case, you could use 1-second precision of datetime2(0) type (6 bytes). Or, for 1 minute precision, you can end up with 4-byte smalldatetime data.

You should also remember that smaller data rows help with the performance during the scans. The table with smaller rows would have more rows stored on the data page and, therefore, would have less data pages stored in the index. Queries that need to perform scans (including range scans) will be faster due to the less I/O operations involved. Last but not least, such indexes will use less memory in the buffer pool, which allows to cache more data and reduces the number of physical I/O in the system.

Finally, you should remember that table alteration never ever decreases size of the data row. You should rebuild the indexes that reference altered columns in order to see the space saving.

7. Storing LOB data outside of the database

So far, we have discussed how to reduce the size of IN_ROW data. Let’s talk a bit about LOB data. First, let’s discuss the situation with the binary data, which does not require any in-database processing. For example, images, binary documents and other similar entities. With such entities, you always have the question of how to store them. Either within the database or externally, keeping just a reference (perhaps file name) in the database.

There was the rule of thumb introduced by Microsoft at time of FILESTREAM release. The binary data greater than 1MB would benefit from external storage. The data smaller than 200KB should live within the database. Well, everything in between is in the grey area. While I do not want to charge the numbers, there are usually more factors involved that just a size. Obviously, I am not talking about huge binary objects when the choice is obvious, but in general, you should make the decision on case-by-case basis.

In-database storage of binary data is usually the simplest solution to implement. The obvious downside of this approach is the increase of the database size. However, you can mitigate it up to degree with proper architecture. For example, you can put binary data to the separate filegroup(s) that reside on the slower disk arrays. You can also implement partial backup and exclude static binary data from the dayly backup files. In Enterprise Edition of SQL Server, you can utilize piecemeal restore and achieve strict RTO requirements even with the binary data in the database; however, in non-Enterprise Edition, RTO requirements could become the deal breaker. Binary data could significantly slow down restore time (due to the database and backup size), which can prevent you from meeting RTO requirements.

In case, if you decided to store binary data outside of the database, there are several questions to answer. The first, and perhaps the most important one, is how to handle redundancy and high availability of external data. For example, if you decided to store binary data as the files and reference them in the database, you need to make sure that such schema is compatible with SQL Server High Availability solution and file storage itself is redundant. Redundancy question mainly relies on storage administrators; however, High Availability aspect could be tricky in this scenario. Especially, if you have geo-redundancy and/or hybrid solutions in place. Obviously, you can implement something based on SAN replication moving files across multiple data centers; however, it requires significant investments into the hardware and software as well as incur the implementation cost.

Consistency of the data is another important question. If binary data needs to be transactionally consistent, you have a little choice but using FILESTREAM. While it is technically possible to implement the consistency in the code without FILESTREAM – for example, if transaction modifies the data, application generates another file and replace the reference to this file in the database; it would be extremely hard to support disaster recovery in this scenario. As you can guess, you can easily have “out of sync” situation when restoring data from the backup.

FILESTREAM could help you here; however, it has a few caveats. It is incompatible with some of SQL Server features, for example with database mirroring and, in some cases, it is complicated to implement. Performance-wise, you should use Streaming API on the client side to get the most from it.

As I already said, there is no right or wrong solutions. You should consider pros and cons of all approaches and consider other requirements in the system. With Enterprise Edition, I personally prefer to store relatively small (up to a few MB) data in the database carefully architecting filegroup layout and backup/restore strategy in case if I am using Enterprise Edition of SQL Server. With Standard Edition, the choices are much more limited.

8. Compressing LOB data in the database

As you already know, data compression is Enterprise Edition feature that compresses IN_ROW data only. However, it is entirely possible, that large amount of space in the database is consumed by LOB data. Do not forget, that there are plenty of data types that are, in the nutshell, LOBs. Think about XML as the example – it is not uncommon to see that XML-centric systems with XML data that consume large amount of space in the system.

One of the approaches to address such an overhead is manually compress LOB data in the code. It is very easy to create the methods to compress and decompress data utilizing one of the classes from System.IO.Compression namespace, for example using GZipStream class. Moreover, that method could be implemented in CLR stored procedures and used directly in T-SQL code.

I am not going to provide the examples of how to code that; you should be able to find quite a few of them searching in Internet. I would like, however, to discuss a couple implementation-related questions.

First, compression is CPU intensive. It is better to run such code on the client whenever it is possible. I would still, however, suggest implementing CLR routines in the database and have them available to T-SQL code. This could help to address some of the use-cases, when client needs to work with uncompressed data. Consider, for example, some external analytical or reporting tools that query the database directly. You can create the view that call CLR function and decompress the data on the fly providing it to the clients.

You should be careful with the version management in such scenario making sure that the code is the same on both, client side and in the database and that algorithms remain the same and data can be decompressed on either side.

The second important consideration is performance. Obviously, decompression adds an overhead, which you would like to avoid on the large scope. For example, it is the bad idea to have a query that scans large amount of data and performs decompression on every row to evaluate the predicate against one of compressed attributes. For example, query shown below would be highly inefficient.

select 
from T
where convert(xml,dbo.DecompressData(CompressedXML)).value('..') = 1

One of the ways to address such an issue is creating persisted calculated columns for the attributes that are used in where clauses of the queries. The downside of this approach is that SQL Server would not be able to use parallel execution plans in such queries – this is one of the limitations of Query Optimizer when you are using columns calculated with scalar UDFs. However, it is often the small price to pay comparing to constant decompression overhead.

With all being said, compressing LOB data manually is definitely the option, which is worth considering. You can use sys.dm_index_physical_stats view to evaluate amount of such data on per-index basis. Obviously, Pareto 80/20 principle still applies – do not add extra complexity if benefits are not worth it.

UPDATE (2-15-04-07): More details about this method are here.

9. Storing Data in Clustered Columnstore Indexes

In case of Enterprise Edition of SQL Server 2014, you have another option to consider. You can store some of the data in columnstore format utilizing Clustered Columnstore Indexes. This format can provide significant space saving comparing to the regular B-Tree row-based storage. Moreover, you can also utilize Archival Columnstore Compression that applies gzip-like compression on columnstore data and reduces the size even further at cost of extra CPU load.

Just to give you an example, Figure 9 below shows you the difference in the storage space between row-based and column-based storage. The table in this example was generated based on FactSalesBig table from AdventureWorks2012DW database. Obviously, different data leads to the different results; however, in the most cases, clustered columnstore indexes would give you order of magnitude decrease on the storage space. It is also worth mentioning that nonclustered indexes on B-Tree tables would contribute to additional storage space, which is not the case with clustered columnstore indexes that are the single copy of the data in the table.

09. Storage Size based on different compression methods and storage formats

Obviously, clustered columnstore indexes are not for everyone. They are very beneficial for Data Warehouse workload that requires to scan and aggregate large amount of data. The same time they are the very bad choice for OLTP workload – they do not support point-lookups nor small range scans.

Same time, it is not uncommon to have different use-cases for the old and new data in OLTP systems. Customers can generate OLTP workload to support day-to-day operations with the new data; however, the old data can be used for analysis and reporting, which is mainly Data Warehouse workload. In such scenario, you can consider to partition your data into the multiple tables using columnstore format for the tables with the old data. You can abstract all those changes via partitioned views making the differences in the schema and storage format transparent to the clients.

This is by no means not the simplest thing to implement. However, such design could lead to significant performance improvements and storage space saving for the certain kind of workloads.

10. Reducing amount of free space in the database

Finally, let’s discuss what we can do when data files have large amount of free space.

As strange as it sounds, one of the best possible options in that case is leaving everything as is. Consider the situation when system implements sliding-window pattern keeping 1-year worth of data in the system. Typically, such systems purge the data based on some schedule. For example, it is possible that every 1st day of the month system purges the 13th month of data – the one with the data older than 1 year.

Let’s assume that system collects 500GB of data per month. In this scenario, if you measured amount of free space in the data files right after the purge, you would notice that files have more than 500GB of free space available. Obviously, you can shrink the files and release such space to OS; however, the database would reclaim it as data growth.

However, for the purpose of this discussion, let’s assume that we have legitimate case to decrease the size of the files. Unfortunately, it is not very easy to do. DBCC SHRINKFILE command is the terrible way to reduce the size of the database. That command works in the very simple matter – it starts to move the allocated extents from the end of the file to unallocated space in the beginning of the file. As you can guess, this leads to the terrible index fragmentation. Moreover, it generates excessive amount of log records, which can affect the system in the multiple ways.

Obviously, you can perform index maintenance after you are done with the shrink. However, there is the catch – index rebuild will grow the file again (it needs space to accommodate the new version of the index). Index reorg could be the better choice in this scenario even though it does not provide results in par with the index rebuild. In the end, everything depends on amount of the space you are clearing and the size of your data. For example, if you had terabytes of free space and your biggest index is just a couple hundred gigabytes, you could consider to shrink and run index rebuild afterwards. Files would grow; however, such growth is much smaller comparing to space saving after the shrink.

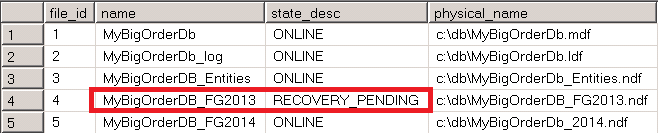
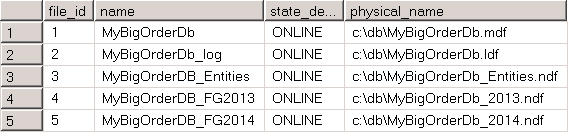
Another, and often the better way to accomplish the task is moving all the data to another filegroup dropping original filegroup afterwards. The actual implementation would vary based on the version and edition of SQL Server. In Enterprise Edition, you can perform online index rebuild to the different filegroup, which will keep system available during the process. In Standard Edition, you can rebuild indexes only offline.

There is another catch though – index rebuild does not move LOB data between filegroups by default. The only way to workaround it is by rebuilding index to the new partition schema instead of the filegroup. However, it requires Enterprise Edition, which supports partitioning. Unfortunately, in Standard Edition you are out of luck.

I am not providing the examples here; however, I would like to reference my book again where I have discussed it in details. Alternatively, you can download book demo scripts and see how data movement works in action.

Lastly, there is always the option of creating another table on another filegroup, copying data there and dropping original table and renaming the new table afterwards. This approach would work in either edition; however, in the most part of the cases it needs be done offline. Online implementation is, of course, possible but it is usually complicated if table has volatile data.

Wrapping Up

This blog post ended up being much bigger than I expected. Unfortunately, even with such size it was impossible to cover all the details for some of the methods. Anyway, I hope you found this information useful, at least as the high-level overview.

Please, do not take the order in which I outlined approaches as the guideline. Every system is unique and you need to design the solution targeted to particular system taking hardware, software and business requirements into consideration.

Partial Database Backup and Piecemeal Restore in Microsoft SQL Server

Unfortunately, disasters happen. Regardless of how good is High Availability strategy that you have implemented, there is always the chance that one day you will need to move the database to another server and quickly bring system online. And the chance is – you will have to do it under stress with your phone ringing every few minutes and your manager asking about ETA. It does not help that such process can be very time consuming in the case of the large databases.

Enterprise Edition of SQL Server supports concept of piecemeal restore and allows you to restore database on filegroup-by-filegroup basis keeping database online during the process. Queries that access data from online filegroups would work just fine. This is the great technique that can dramatically reduce system downtime.

In the large number of cases, the size of the operational data that is required for system to be operational is relatively small. Historical data, on the other hand, is often kept due to regulation/compliance reasons and rarely accessed by the applications. As you can guess, it allows you to quickly bring part of the database that supports operational activity online and work with remaining historical data afterwards while customers can connect and use the system.

Obviously, you should design data placement in the way that supports piecemeal restore. In the nutshell, it means the separation of the operational and historical data across different filegroups. As the example, let’s consider Order Entry/Shopping Cart system that stores data for several years. One of the data layout designs could be the following:

  • Empty Primary FG. Primary Filegroup should be online in order for database to be online. It is good idea to keep primary filegroup empty and do not place any objects there.
  • Entities FG. This filegroup could store catalog tables, such as Customers, Articles and others.
  • One or more filegroups for the operational data. For example, if operational period is the current year, this filegroup can store Orders, OrderLineItems and related entities that stores current-year data.
  • One or more filegroups for the historical data. Those filegroups store data that is not required to support operational activity in the system.

Piecemeal restore strategy will require you to bring online Primary, Entities and Operation data filegroups first. System will be available to the customers at this point. After that, you can work on restoring historical data filegroups, which in most part of the cases, will be significantly larger than operational data and, therefore, will take longer time to restore.

It is also worth noting, that in case of SQL Server 2014 In-memory OLTP, you should also have Hekaton filegroup online before database becomes available to the users. Usually, In-memory tables keep operational data anyway, so it should not be a problem in most part of the cases.

Let’s look at the example and create a database with the structure outlined above. For simplicity sake, every filegroup has only one data file. However, in the real-life you should consider creating multiple files to reduce allocation contention in the filegroups with volatile data.

create database [MyBigOrderDb]
on primary
(name = N'MyBigOrderDb', filename = N'c:\db\MyBigOrderDb.mdf'), 
filegroup [Entities] 
(name = N'MyBigOrderDB_Entities', filename = N'c:\db\MyBigOrderDB_Entities.ndf'), 
filegroup [FG2013] 
(name = N'MyBigOrderDB_FG2013', filename = N'c:\db\MyBigOrderDB_FG2013.ndf'), 
filegroup [FG2014] 
(name = N'MyBigOrderDB_FG2014', filename = N'c:\db\MyBigOrderDB_FG2014.ndf')
log on
(name = N'MyBigOrderDb_log', filename = N'c:\db\MyBigOrderDb_log.ldf')

As the next step, let’s create a few tables including partitioned table Orders.

create table dbo.Customers
(
    CustomerId int not null,
    CustomerName nvarchar(64) not null,
)
on [Entities];

create table dbo.Articless
(
 ArticlesId int not null,
 ArticleName nvarchar(64) not null,
)
on [Entities];

create partition function pfOrders(smalldatetime)
as range right
for values('2014-01-01');

create partition scheme psOrders
as partition pfOrders
to (FG2013,FG2014)
go

create table dbo.Orders
(
    OrderId int not null,
    OrderDate smalldatetime not null,
    OrderNum varchar(32) not null,
    constraint PK_Orders
    primary key clustered(OrderDate, OrderId)
    on psOrders(OrderDate)
)
go

insert into dbo.Customers(CustomerId, CustomerName) values(1,'Customer 1');
insert into dbo.Orders(OrderDate, OrderId, OrderNum)
values
    ('2013-01-01',1,'Order 1'),
    ('2013-02-02',2,'Order 2'),
    ('2014-01-01',3,'Order 3'),
    ('2014-02-02',4,'Order 4')

Next, let’s create the backup chain and perform FULL, DIFFIRENTIAL and LOG backups.

-- Full backup
backup database [MyBigOrderDb] 
to disk = N'c:\db\MyBigOrderDb_Full.bak' 
with noformat, init, name = N'MyBigOrderDb-Full Database Backup', 
    compression, stats = 2
go

-- Differential backup
backup database [MyBigOrderDb] 
to disk = N'c:\db\MyBigOrderDb_Diff.bak' 
with differential, noformat, init, 
    name = N'MyBigOrderDb-Differential Database Backup', 
    compression, stats = 2
go

-- Transaction log
backup log [MyBigOrderDb] 
to disk = N'c:\db\MyBigOrderDb_Log.trn' 
with noformat, init, name = N'MyBigOrderDb-Tran Log', 
    compression, stats = 2
go

And at this point, let’s assume that disaster happens and we need to move database to another server. In this example, I would assume that we still have access to transaction log of the original database and we will perform tail-log backup to avoid any data loss.

backup log [MyBigOrderDb] 
to disk = N'c:\db\MyBigOrderDb_TailLog.trn' 
with no_truncate, noformat, init, name = N'MyBigOrderDb-Tail Log', 
 compression, norecovery, stats = 2

At this point, we will need to copy all files from the backup chain to another server and start restore process. We will perform piecemeal restore of Primary, Entities and FG2014 filegroups to support operational activity of the system without bringing historical FG2013 data online. The first operation is performing restore of the FULL database backup specifying just the filegroups we need to restore.

-- Restoring on another server (Same folder structure for demo sake)
-- Full Backup
restore database [MyBigOrderDb] 
FILEGROUP = 'primary', FILEGROUP = 'Entities', FILEGROUP = 'FG2014'
from disk = N'C:\DB\MyBigOrderDb_Full.bak' with file = 1,
move N'MyBigOrderDB' to N'c:\db\MyBigOrderDb.mdf', 
move N'MyBigOrderDB_Entities' to N'c:\db\MyBigOrderDb_Entities.ndf', 
move N'MyBigOrderDB_FG2014' to N'c:\db\MyBigOrderDb_2014.ndf', 
move N'MyBigOrderDb_log' to N'c:\db\MyBigOrderDb.ldf', 
NORECOVERY, partial, stats = 2;

it is worth mentioning, that I am using WITH NORECOVERY clause in all RESTORE commands including tail-log backup restore. In the end, I am recovering database with the separate RESTORE statement. This is just a good practice and safety measurement. By default, Management Studio uses WITH RECOVERY option with restore, which can lead to the situation that you accidentally recovered database at intermediate restore stage. You would not be able to restore further backups after that and would be forced to start from scratch.

As the next steps, we need to restore DIFFERENTIAL, LOG and tail-log backups as shown below. You do not need to specify filegroups as part of restore statement anymore – SQL Server would perform restore only in scope of the filegroups we are working with and which are in RESTORING state.

-- Diff Backup
restore database [MyBigOrderDb] 
from disk = N'C:\DB\MyBigOrderDb_Diff.bak' with file = 1,
NORECOVERY, stats = 2;

-- Tran Log
restore database [MyBigOrderDb] 
from disk = N'C:\DB\MyBigOrderDb_Log.trn' with file = 1,
NORECOVERY, stats = 2;

-- Tail-log
restore database [MyBigOrderDb] 
from disk = N'C:\DB\MyBigOrderDb_TailLog.trn' with file = 1,
NORECOVERY, stats = 2;

-- Recovery
restore database [MyBigOrderDb] with RECOVERY;

At this point, our database is partially online. We can query operational data as it shown below in Figure 1.

select * from MyBigOrderDb.dbo.Customers
select * from MyBigOrderDb.dbo.Orders where OrderDate >= '2014-01-01'

01. Querying Data from Operational Filegroups

However, if we try to query historical data, we will get an error, as shown in Figure 2

select * from MyBigOrderDb.dbo.Orders where OrderDate < '2014-01-01'

02. Querying Data from Historical Filegroup

You can check the status of the database filegroups with the following query. Figure 3 shows that three filegroups are online while FG2013 filegroup is still in RECOVERY_PENDING stage.

select file_id, name, state_desc, physical_name
from MyBigOrderDb.sys.database_files

03. Filegroup Status Before Historical Filegroup Restore

As you see, customers can use the system while we are working on restoring of FG2013 filegroup. We can perform this with the following script:

-- Full Backup (restoring individual filegroup)
restore database [MyBigOrderDb] 
FILEGROUP = 'FG2013'
from disk = N'C:\DB\MyBigOrderDb_Full.bak' with file = 1,
move N'MyBigOrderDB_FG2013' to N'c:\db\MyBigOrderDb_2013.ndf',  
stats = 2;

-- Diff Backup
restore database [MyBigOrderDb] 
from disk = N'C:\DB\MyBigOrderDb_Diff.bak' with file = 1,
stats = 2;

-- Tran Log
restore database [MyBigOrderDb] 
from disk = N'C:\DB\MyBigOrderDb_Log.trn' with file = 1,
stats = 2;

-- Tail-log
restore database [MyBigOrderDb] 
from disk = N'C:\DB\MyBigOrderDb_TailLog.trn' with file = 1,
stats = 2;

Now database is online as it is shown in Figure 4.

04. Filegroups Status After Historical Filegroup Restore

Piecemeal restore can significantly decrease database restore time. However, there is still time-consuming part in this process. Regardless how many filegroups you are restoring, you should copy/move backup file that contains initial FULL database backup to the new server. Time of this operation depends on network throughput and slow network and/or large backup files can lead to very long delays.

Obviously, you can take several approaches. You can always “be prepared” and copy files to reserved server after each backup. With such strategy, you would already have backup files in place when they need to be restored if/when disaster occurs.

However, you can use another approach if historical data is read-only. This approach is called “partial database backup”. Even though, Microsoft stated that it is designed for SIMPLE recovery models, it would work just fine with FULL recovery model, as long as you implemented it correctly.

Let’s look how it works and as the first step, let’s mark our FG2013 filegroup as read-only:

alter database MyBigOrderDb modify filegroup FG2013 readonly

At this point, you should start the new backup chain, which, in the nutshell, are two different sets of backup files. One set includes backup files for read-write filegroups (FULL, DIFFERENTIAL and LOG backups using READ_WRITE_FILEGROUPS option. In addition, you need to perform backup of read-only filegroup. You can do it with the script shown below:

-- Backing Up Read-Only Filegroup
backup database [MyBigOrderDb] 
FILEGROUP = N'FG2013'
to disk = N'c:\db\MyBigOrderFG2013.bak' 
with noformat, init, 
	name = N'MyBigOrderDb-FG2013 FG backup', 
	compression, stats = 2
go

-- Full backup of read_write filegroups
backup database [MyBigOrderDb] READ_WRITE_FILEGROUPS
to disk = N'c:\db\MyBigOrderDbRW_Full.bak' 
with noformat, init, name = N'MyBigOrderDb-Full Database Backup (R/W FG)', 
	compression, stats = 2
go

-- Differential backup
backup database [MyBigOrderDb] 
to disk = N'c:\db\MyBigOrderDbRW_Diff.bak' 
with differential, noformat, init, 
	name = N'MyBigOrderDb-Differential Database Backup (R/W FG)', 
	compression, stats = 2
go

-- Transaction log
backup log [MyBigOrderDb] 
to disk = N'c:\db\MyBigOrderDbRW_Log.trn' 
with noformat, init, name = N'MyBigOrderDb-Tran Log', 
	compression, stats = 2

The beauty of this situation that now you have data backups separated. You would have relatively small backup chain file(s) for operational data as well as large static backup file for read-only historical data. This will dramatically reduce time required to move operational data backup files over network.  It also helps with day-to-day backup strategy and reduces the time of backup operation and, server and network load, and storage space required to store the files. You can create new backup chains of operation data without taking new backup for historical data as long as those filegroups stay read-only.

If disaster occurs and you need to move database to another server, you can start with operation data backup chain as shown below. For simplicity sake, I am omitting tail-log backup – however, in real life you should always obtain it to avoid data loss.

-- Restoring on another server (Same folder structure for demo sake)
-- Full Backup (R/W filegroups only)
restore database [MyBigOrderDb] 
filegroup = 'primary', filegroup = 'Entities', filegroup = 'FG2014'
from disk = N'C:\DB\MyBigOrderDbRW_Full.bak' with file = 1,
move N'MyBigOrderDB' to N'c:\db\MyBigOrderDb.mdf',  
move N'MyBigOrderDB_Entities' to N'c:\db\MyBigOrderDb_Entities.ndf',  
move N'MyBigOrderDB_FG2014' to N'c:\db\MyBigOrderDb_2014.ndf',  
move N'MyBigOrderDb_log' to N'c:\db\MyBigOrderDb.ldf',  
norecovery, partial, stats = 2;

-- Diff Backup
restore database [MyBigOrderDb] 
from disk = N'C:\DB\MyBigOrderDbRW_Diff.bak' with file = 1,
norecovery, stats = 2;

-- Tran Log
restore database [MyBigOrderDb] 
from disk = N'C:\DB\MyBigOrderDbRW_Log.trn' with file = 1,
norecovery, stats = 2;

-- Recovery
restore database [MyBigOrderDb] with recovery;

If you queried the status of the database filegroups after restore, you would see very similar picture – all operational filegroups are online and historical filegroup is in RECOVERY_PENDING state. Figure 5 illustrates that.

05. Filegroup Status During Partial Restore

Again, at this point system is available to users and you can continue working on historical data while system is operational with the following script.

-- Restoring Read/Only Filegroup
restore database [MyBigOrderDb] 
filegroup = 'FG2013'
from disk = N'C:\DB\MyBigOrderFG2013.bak' with file = 1,
move N'MyBigOrderDB_FG2013' to N'c:\db\MyBigOrderDb_2013.ndf',  
recovery, stats = 2;

Be careful when you change read-only status of the filegroups when partial backup is used. One of examples of such scenario is when operational period changed and you need to move some former-operational data that becomes historical to another filegroup. One of the approaches to accomplish it is making historical filegroup as read-write, copying data there and making it read-only again. You can still restore the database using old read-only filegroup backup as long as you have backup chain with LOG backups that cover data movement operations. However, you would not be able to recover historical data if you start new backup chain for updateable filegroups after the fact and did not take new backup of the read-only filegroup.

As the general recommendation, it is safer to start new backup chain together with backup of historical filegroup after you made historical filegroup read-only again. And, most importantly, regardless what solution you are using, test your backup and restore strategies. This would help you to avoid unpleasant surprises when things went south.