Category Archives: SQL Server 2008

Sunday T-SQL Tip: Equality predicate on large varchar column

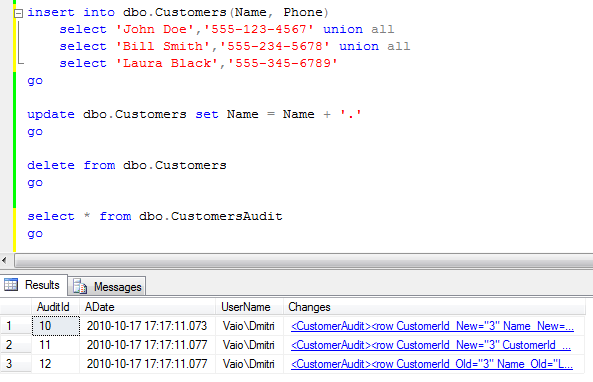
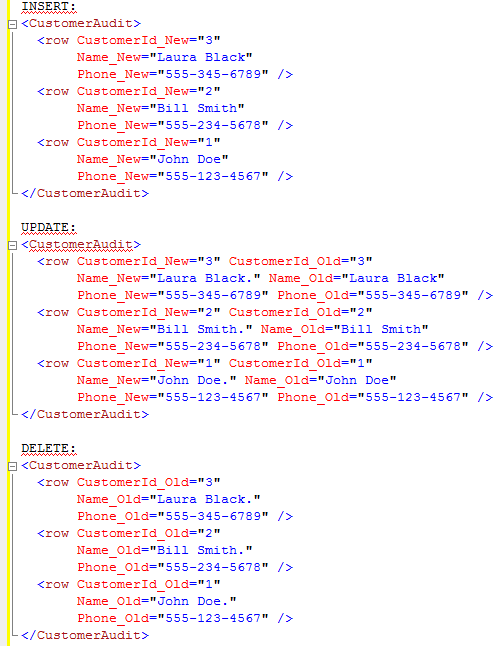
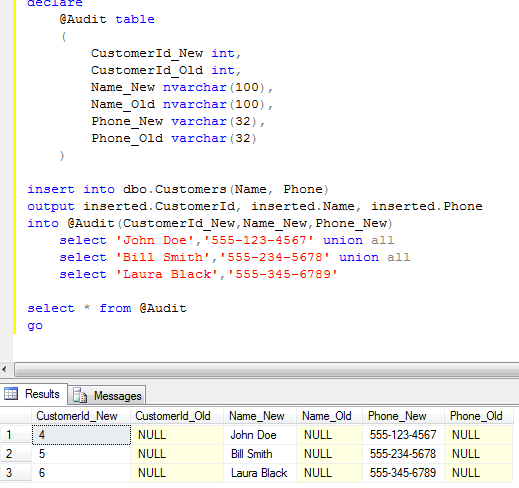
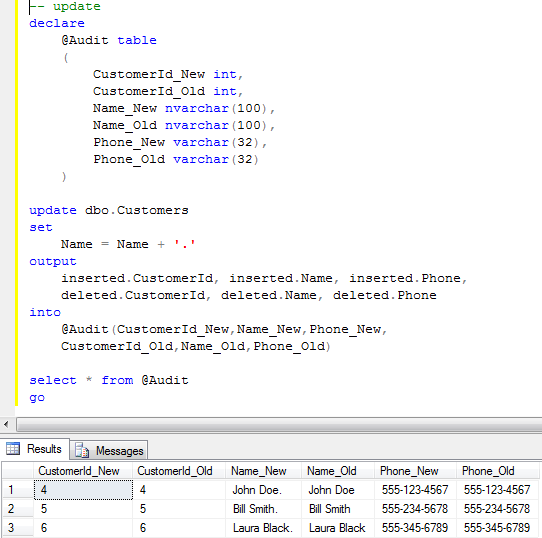
Sometimes you need to do the query based on equality predicate on large text column. It does not happen quite often but it happens.Unfortunately sometimes it’s impossible to create the index on such column. First, the size of the column could be greater than 900 bytes (so index would not be created). Another possibility – you have a lot of data and simply don’t want to use a lot of space for such index.

How to optimize the query in such case? Let’s take a look at the example. First, let’s create the table and add some data there. As you can see, LargeField would have a size of 1080 bytes.

Now let’s try to run the select with the clustered index scan. 9150 reads – quite bad.

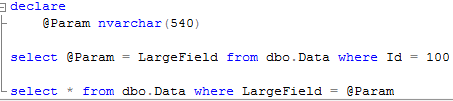
Index cannot be created – 900 bytes is the limitation.

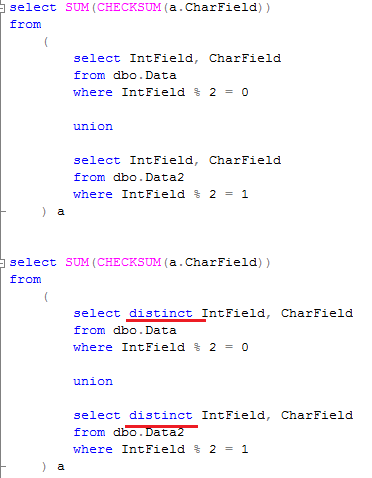
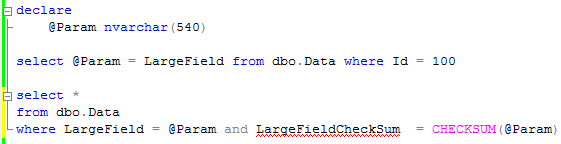
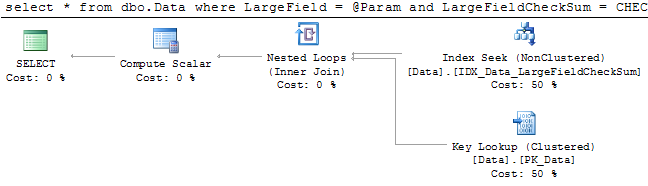
The solution is persisted calculated column with CHECKSUM() function that generates hash of the string. Let’s take a look:


There are 2 things we need to keep in mind. First – hash is not guaranteed to be unique. So statement still needs to include the predicate on the field. Second, unicode and regular strings obviously return different hash. It should not be generally a problem although make sure that client application specify correct parameter data type.

Source code is available for download

Sunday T-SQL Tip: Insert/Update pattern

Let’s think about the system that collects and processes the data. Quite often processing happens after data have been inserted into the system. Typically the rows have set of the columns inserted as NULL. Processing routine loads the rows, update those columns and save rows back.

Looks simple but this pattern introduces major page split/fragmentation issues. Think about that – SQL Server tried to fill pages up to 100%. So when you update the rows, pages don’t have enough free space to keep the data. Let’s look at the example:

First – let’s create the table. There are only 3 columns in this table – identity, char column as the placeholder for the columns populated during insert stage and post processing placeholder.

Second, let’s check the physical index statistics. Index is practically perfect.

Now let’s execute update and populate post processing placeholder column. Now check the statistics – terrible fragmentation and a lot of space wasted.

Obviously the workaround is simple – reserve the space for the post processing columns on the insert stage.

Source code is available here

Sunday T-SQL Tip: Union vs. Union All

What could be simpler than union? Probably “union all”.

“Union” removes all duplicates from the combined row set. Union all simply concatenate the row sets. Obviously, if original row sets are unique, results would be the same. But plans are not.

Take a look here. Let’s create 2 tables with some data.


Now let’s do the union and union all and see the plans.

Union introduces another expensive “Distinct Sort” operator. As result the execution plan with union is almost 2 times more expensive than with union all. Of course, your mileage may vary – in the case of the large and complex queries the higher cost of “Union” operator could be hidden but in any case, it’s more expensive. So don’t use it if rowsets don’t have duplicates.

Speaking of the duplicates – there is another thing you need to keep in mind. When union removes the duplicates from combined rowsets, it does not really matter where duplicates come from. So you don’t need to use distinct as part of the selects. And it affects the plan too. Look here:


Source code is available for download from here

Sql Server Statistics – update and management #2

Last time we saw when SQL Server creates statistics and what database properties affects statistics update behavior. Today let’s talk what triggers statistics update and how can it be updated manually.

As we know, statistics is based on the table data. And obviously statistics is outdated when underlying data is changed. As you can guess at this point, SQL Server tracks the number of the modifications in the table and updates statistics when number of the modifications reach the threshold. Let’s see what is the threshold. Of course, auto update statistics needs to be enabled on the database level.

For the regular tables update is triggered when:

  1. When row count changes from 0 to non-zero
  2. When table has less than 500 rows and there were more than 500 updates on the leading column of the stats
  3. When table has more than 500 rows and there were more than 500+20% of the number of rows changes on the leading column of the stat

For the temporary table there is one additional threshold at 6 rows. This behavior can be altered with OPTION (KEEP PLAN) query hint.

As the side note, temporary table variables do not keep statistics. That can produce quite inefficient plans in some cases. On the other hand update statistics on the temporary tables can introduce extensive number of recompilations. If this is the case, it could be fixed with OPTION (KEEPFIXED PLAN) query hint that prevents query recompilations based on statistics update.

Statistics also updates during index rebuild stage. It does not update during index reorganize operation through..

A few more methods:

  1. UPDATE STATISTICS statement allows you to update either single statistics or all statistics on the table. You can control sampling method there
  2. sp_updatestats update all statistics in the database
  3. Statistics update could be done via maintenance plan

As I mentioned before, in most part of the cases default behavior is OK. Although it’s useful to understand how it works internally.

Sql Server Statistics – update and management #1

As we already know, SQL Server relies on statistics on optimization stage. Obviously, up-to-date and accurate statistics is the key. Let’s see when and how SQL Server manages it.

First of all, there are 3 properties on the database level (Options tab)

“Auto Update Statistics” – controls if statistics is updating automatically. If this option is enabled, SQL Server detects if statistics is outdated and updates it during the query execution. In most part of the cases this is desired behavior. One of the possible examples when you can choose to disable that – if data in the table is fairly stable and updates are coming in the multiple batches nightly. In such case you can disable the auto update and update it manually after all batches are loaded.

“Auto Update Statistics Asynchronously” – By default, statistics is updating synchronously. It means when system executes the query and detects that statistics is outdated, it updates the statistics and recompiles the query. This could introduce additional delay during statistics update phase and queries with low timeout settings could timeout. If you decide to use asynchronous statistics update, sql server generates the plan based on the outdated statistics and updates statistics in another thread.

“Auto Create Statistics” – By default SQL Server creates statistics automatically. You should leave it as is in most part of the cases.

By default, when you create an index, SQL Server automatically creates the statistics with the same name with index.

Sometimes SQL Server can create statistics on column level especially if there is the join operation on non-indexed column

Based on the name convention you can see that this is automatically created statistics on the column 03 on the object with ID 0425A276 (hex). Let’s see that:

Next time we will talk when statistics is updating automatically and how to update it manually.

Sunday T-SQL Tips: Inserted, Deleted tables and OUTPUT clause (Part 3 – Merge and insert of the master/detail data)

Last Sunday we saw what we can do with the MERGE statement and OUTPUT clause. Today I want to show you the practical angle of this feature.

Let’s assume you want to insert packet of master/detail rows in the situation when Master table has ID as identity field.


This is the trivial task if you have only one master row – you can accomplish it with insert statement, get the identity with @@identity or SCOPE_IDENTITY() and next perform insert of the detail rows. The situation is more complicated if you have multiple master-detail rows in the packets. In such case MERGE and OUTPUT would help. First of all, you need to have “internal” unique ID to link master and detail rows in the packets. Let’s see that:

Next, you need to insert the data to the master table with the MERGE operator and get both – internal ID and inserted (identity) ID from the packet. After that you can use simple insert statement.

Code can be downloaded from here

Sunday T-SQL Tips: Inserted, Deleted tables and OUTPUT clause (Part 2 – Merge statement)

Last Sunday we saw how we can intercept new and old values from the row during insert/update/delete operations with OUTPUT clause. Even if it’s very powerful mechanism, there is one very important limitation. You can intercept only values from the row of the table that gets updated.

So, for example, if you have:

you can intercept the values from DestTable rows but you cannot get any values from SourceTable rows.

In SQL Server 2005 you’re stuck. Fortunately SQL Server 2008 has the solution for that problem – Merge operator.

So what is MERGE? In short – it’s insert/update/delete operatorĀ  – all-in-one. Assuming you have a source table and need to do that batch update based on another table. So you need to delete rows on the source table that do not exist in the second table, insert new rows from the second table and update modified rows. Let’s see that:

So Refresh process should delete row with ID = 1 from the SourceTable, insert row with ID = 7 and update rows with ID = 3 and 6.

Let’s see that in action. SQL 2005 approach is to use separate statements:

As you can see it works. But there are 3 statements. Longer locking, side effects based on the isolation levels, etc etc etc.

Now let’s do the same thing with MERGE operator:

As you can see – one operator and that’s all. Very useful and very very very convinient. But that’s not all – let’s see what can be done with the OUTPUT clause there:

It’s not only allowing you to capture old and new version of the row, it also allows to capture ACTION and the field from the Source (DataTable). The last one cannot be done with the regular insert/update/delete statements.

We will see what benefits will it give us next Sunday.

The code can be downloaded here

Composite Indexes

Last time we defined when single column index can be used for the index SEEKs. Now let’s talk about composite indexes.

Obviously, the first, and most important question – when composite index can be used for the SEEK operations. Let’s take a look at the example. Let’s create the table with 250,000 rows and create composite index on such table.

Now let’s run a few tests:

As you can see, SQL Server uses index seek each time when predicate on the Column1 (leftmost column) is SARG. The last select where we don’t have the predicate on this column produces the clustered index scan.

So it’s that simple – composite index can be used for the index SEEK as long as predicates on the index leftmost columns are SARG. Well, in real life it’s a little bit more complicated – you should not forget about really small threshold for non-clustered index usage. If SQL Server expects that iterator returns more than a few % of total table rows, index would not be used.

This leads us to quite interesting conclusion. If you have an index on (Column1, Column3), you don’t need to have the separate index on (Column1). Granted, seeks on the second single-column index would be faster because of the smaller row size, but performance benefits you gain in most part of the cases do not worth the price of the index maintenance.

Code can be downloaded from here

Sunday T-SQL Tips: Inserted, Deleted tables and OUTPUT clause (Part 1 – insert/delete/update statements)

During the next a few Sundays I’m planning to talk about one of the under-appreciated constructs in T-SQL – OUTPUT clause. This clause can help you a lot when you need to develop set-based code or convert old cursor-based code into the set operations.

Output clause works together with inserted and deleted system tables. Every developer who wrote at least one DML Trigger familiar with those tables. Those are 2 tables that SQL Server populates and manages automatically. Inserted table contains the new version of the row values. Deleted tables contains the old version of the row values. As you understand inserted table has the data during insert and update operations. Deleted table has the data during update and delete operations.

Let’s see that in the action. First let’s create a table:

Now let’s assume we want to implement the audit trigger. Below is very simple and straightforward approach how we can do that:

Now let’s test the solution.

Below is the XMLs

Anyway, the good and very useful thing that inserted and deleted tables are available not only with the triggers but with insert/update/delete statements. Let’s take a look. First – insert:

As you can see – you have access to generated identity values. You can see that itĀ  works the same way with updates and deletes.

One particularly interesting thing is what happen if statement is rolled back. Let’s populate data to the table again and create the trigger which rollbacks the transaction

Now let’s run the update statement:

As you can see – statement is rolled back – the data has not been changed in the original table but deleted/inserted table were created and populated. Output clause also worked. Such behavior opens the door to the interesting possibilities, for example audit on rollback.

You can download the script from here. Next Sunday we will talk about OUTPUT clause with MERGE statement. This combination is much more powerful than OUTPUT with insert/update/delete.

Sunday T-SQL Tip: APPLY operator

One of the new features of SQL 2005 is APPLY operator. Based on books online APPLY is:

The APPLY operator allows you to invoke a table-valued function for each row returned by an outer table expression of a query. The table-valued function acts as the right input and the outer table expression acts as the left input. The right input is evaluated for each row from the left input and the rows produced are combined for the final output. The list of columns produced by the APPLY operator is the set of columns in the left input followed by the list of columns returned by the right input.

A bit confusing if you read it for a first time. Let’s try to clarify it. Think about APPLY the same way as about the JOIN. The difference is that JOIN tables are independent from each other but APPLY is dependent from the left source. There are 2 types of APPLY – CROSS APPLY (think about it as about it as about inner join) and OUTER apply (outer join)

Let’s see it in the example. This will use the orders table created earlier (code can be downloaded from here).

Let’s create the Customers table and populate it with the data

Assuming we want to return the result set that returns 2 most recent orders per customer. Let’s create inline table-valued functions which can do that.

Now let’s write select with cross apply – again think about it as about inner join that joins customer data (source) with 2 rows per customer produced per table-valued function.

Here it is. As you can see – it’s quite simple. What’s interesting about it – you don’t really need to use the function – you can simply put dependent select into the FROM cause. Look below:

You can download the code from here