I am heavily relying on virtualization in my home lab. I prefer to build separate SQL Server environments for different projects keeping them clean and isolated from each other. I can work with multiple SQL Server versions side by side without worrying how some components in my setup affect others.
This setup is also great for presentations and trainings I deliver. I just need to reset VM to the “starting” checkpoint and everything would be in the known and healthy state. Believe me, this saves you from a lot of pain and embarrassment when you are staying in front of people. Troubleshooting of non-working demos is not fun when you are on the stage.
There is the problem with this setup, however. It is much easier and faster to checkpoint existing VM rather than provision the new one for the new setup. In the end, unless you have self-discipline I lack, you may end up with something like shown in Figure 1 below. This is the screen shot of one of my VMs checkpoints.
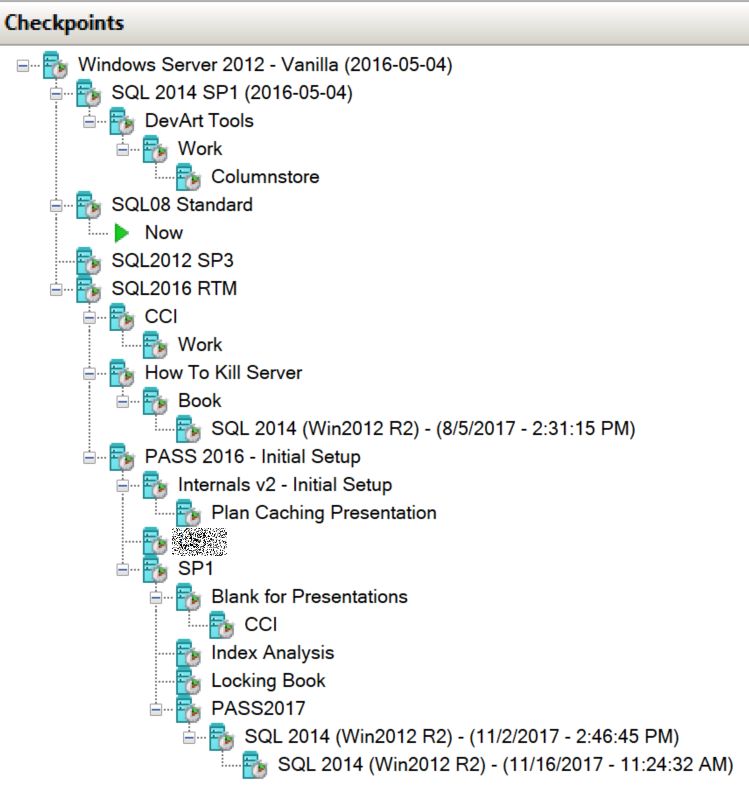
01. Mess in VM configuration
On the surface, this setup may provide you required isolation between environments. However, there is the problem with maintainability. Consider how much efforts it would take to apply new SP or CU to all of your checkpoints. In the end, you will be in the situation when you always want to rebuild your lab and you never have time to do it properly. Thus, I decided to look at other options and evaluate Docker and SQL Server in containers when I recently had to setup the new travel laptop. I found that containers are better suited to my needs comparing to VM-based virtualization and I want to share my experience with you.
As the disclaimer, I am going to focus on the infrastructure side and maintainability and not going to discuss underlying technologies and containerization. You can read about it here if you want.
While both, containers and VMs rely on virtualization, they are conceptually different on the infrastructure side. Figure 2 illustrates the general virtual machine. .
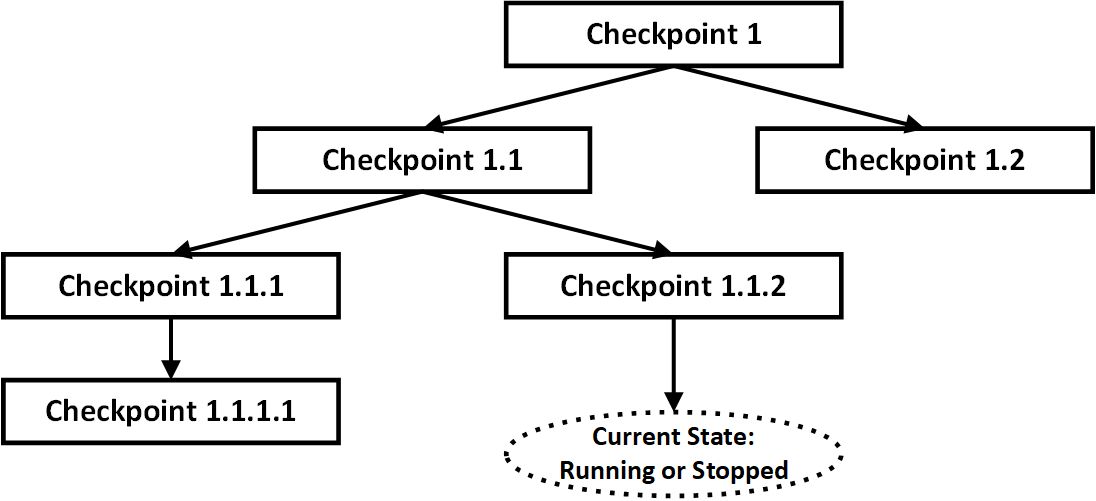
02. VM and Checkpoints
Each virtual machine may consist of multiple checkpoints/snapshots, which fork it to the multiple states. However, only one state may be active at any giving point of time. Neither could you run multiple instances of the single VM simultaneously – you’ll need to clone them creating separate VMs for that.
Containers, on the other hand, operate differently as shown in Figure 3. The environment consists of multiple images, which conceptually similar to checkpoints/snapshots. However, every image may have multiple containers (running or stopped), which are the active instances/environments. It is worth noting that Docker API allows you to checkpoint a container, but I see little benefits of doing that.
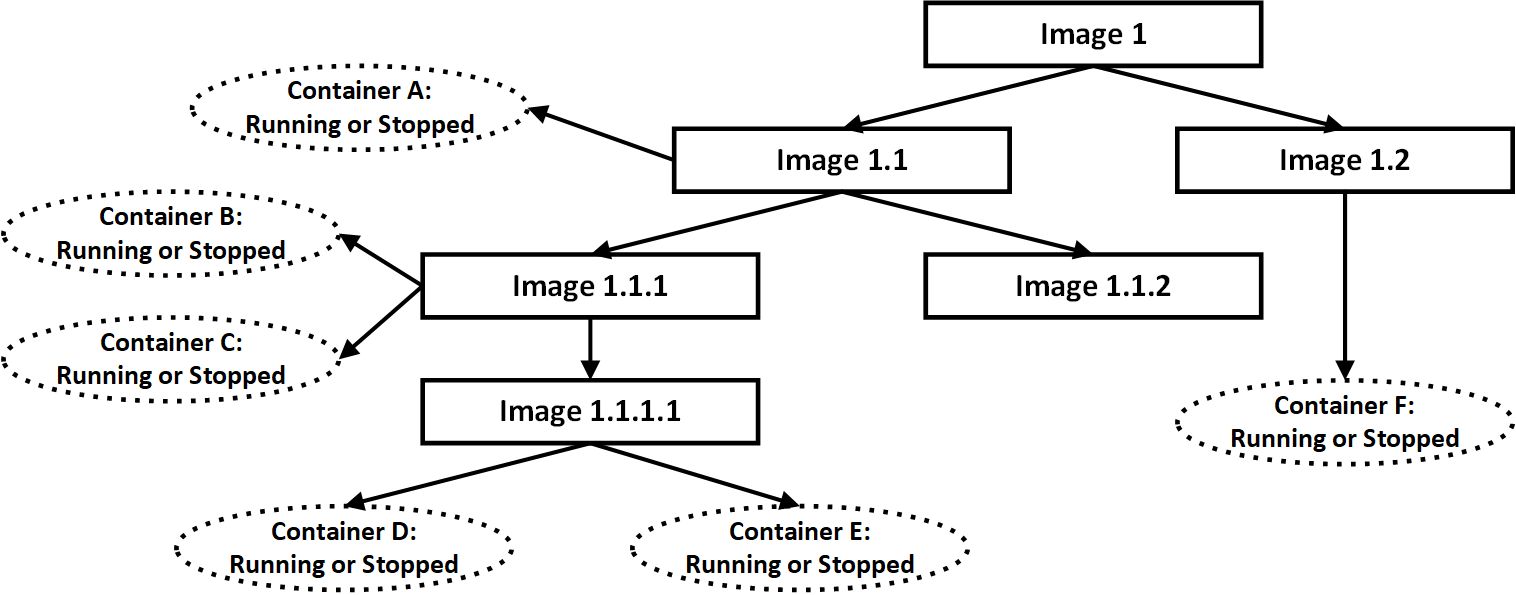
03. Images and Containers
That conceptual difference force you to use different methods to solve problems. Think about the situation when you need to setup individual development environments for each member of the team. With VM-based virtualization, you will have to create separate VMs. With containers, you need to create the base image and start multiple containers from this image.
Both approaches have pros and cons. The containers will use less disk space than VMs – you will have only one image on disk. They are also easier to maintain and refresh – you need to build the single image. VMs, on the other hand, provide true separation. If one developer is working on the complex feature in its own branch, there is no dependency on the shared image – you can refresh other VMs keeping his one intact.
Nothing, obviously, prevents you from having multiple images achieving the same degree of separation with containers. You just need to manage them a bit differently. I, personally, believe that containers will be easier to maintain and lead to the cleaner setup in the long run.
Anyway, let’s do the setup. Mind you, I do not consider myself as the Docker expert – I am sure that there are the better ways to achieve the goals. Nevertheless, I want to share several tips and tricks I did in my environment.
I am going to use SQL Server 2017 in Windows containers setting everything up on Windows 10 machine (you need to have Anniversary Update Build 1607 or later) . I am sure that you can use similar approach in different OS and/or with SQL Server in Linux.
As the first step, you need to install Docker. You can download it from here – you can read the instruction – it is straightforward. Just make sure to choose Windows Containers during setup. After Docker setup is done, you may test your setup using Hello World image as outlined here. I did not do it – after all, we are about to run SQL Server anyway.
As the next step, let’s pull SQL Server 2017 Developer Windows image. Make sure that Docker is running, open PowerShell and run the following command.
docker pull microsoft/mssql-server-windows-developer:latest
It will take some time to download but then you are pretty much done – you have SQL Server “installed”. The following command will display you the list of images you have installed on your machine:
docker image ls
Figure 4 shows the output you would see.

04. SQL Server Image
As the side note, you can remove images using one of the following commands (obviously do not run it now). In some cases, for example if you had an error when you built the image, you may end up with the images that do not have names and you’ll need to use ID to clean them up.
docker image rm <name>

docker image rm <image_id>
Now, let’s create the container with SQL Server 2017 by running the following command. This will create the container with name sqlserver.
docker run --name=sqlserver -d -p 1433:1433 -e sa_password=Pas!w0rd12345 -e ACCEPT_EULA=Y microsoft/mssql-server-windows-developer
The -p switch sets up the port mapping between local instance and the container. In our case, both ports are the same and SQL Server in container will work (and look like) as if you have SQL Server default instance installed locally. All requests host received on port 1433 would be redirected to the container. Obviously, you need to change the port mapping if you already have SQL Server installed on your box and/or if you have multiple containers running. Also, do not forget to open the port in the firewall if you accessing the image remotely.
Now, you can connect to SQL Server by using localhost or localhost,1433 as the server name and sa/Pas!w0rd12345 for the authentication.
Alternatively, you can find IP address of the container. First, let’s run the following command to see list of active containers in the system
docker container ls -all
Figure 5 shows the output – as you see, we have just one running container in the system. You can use either name or container_id during container management.

05. Running Containers
Next, let’s run the command below to get container information.
docker inspect sqlserver
Figure 6 illustrates the partial output of the statement – the configuration is presented in JSON format. You can look at IPAddress element there.

06. Inspect Container Configuration
You can also run the following command to parse the output of docker inspect obtaining IP address without any additional information:
docker inspect --format='{{range .NetworkSettings.Networks}}{{.IPAddress}}{{end}}' sqlserver
In my environment, I prefer to connect to containers using IP Addresses rather than port mapping. By default, Docker assigns random IP Address every time you start container, which is inconvenient. You can workaround it by assigning specific IP to the container when you start it.
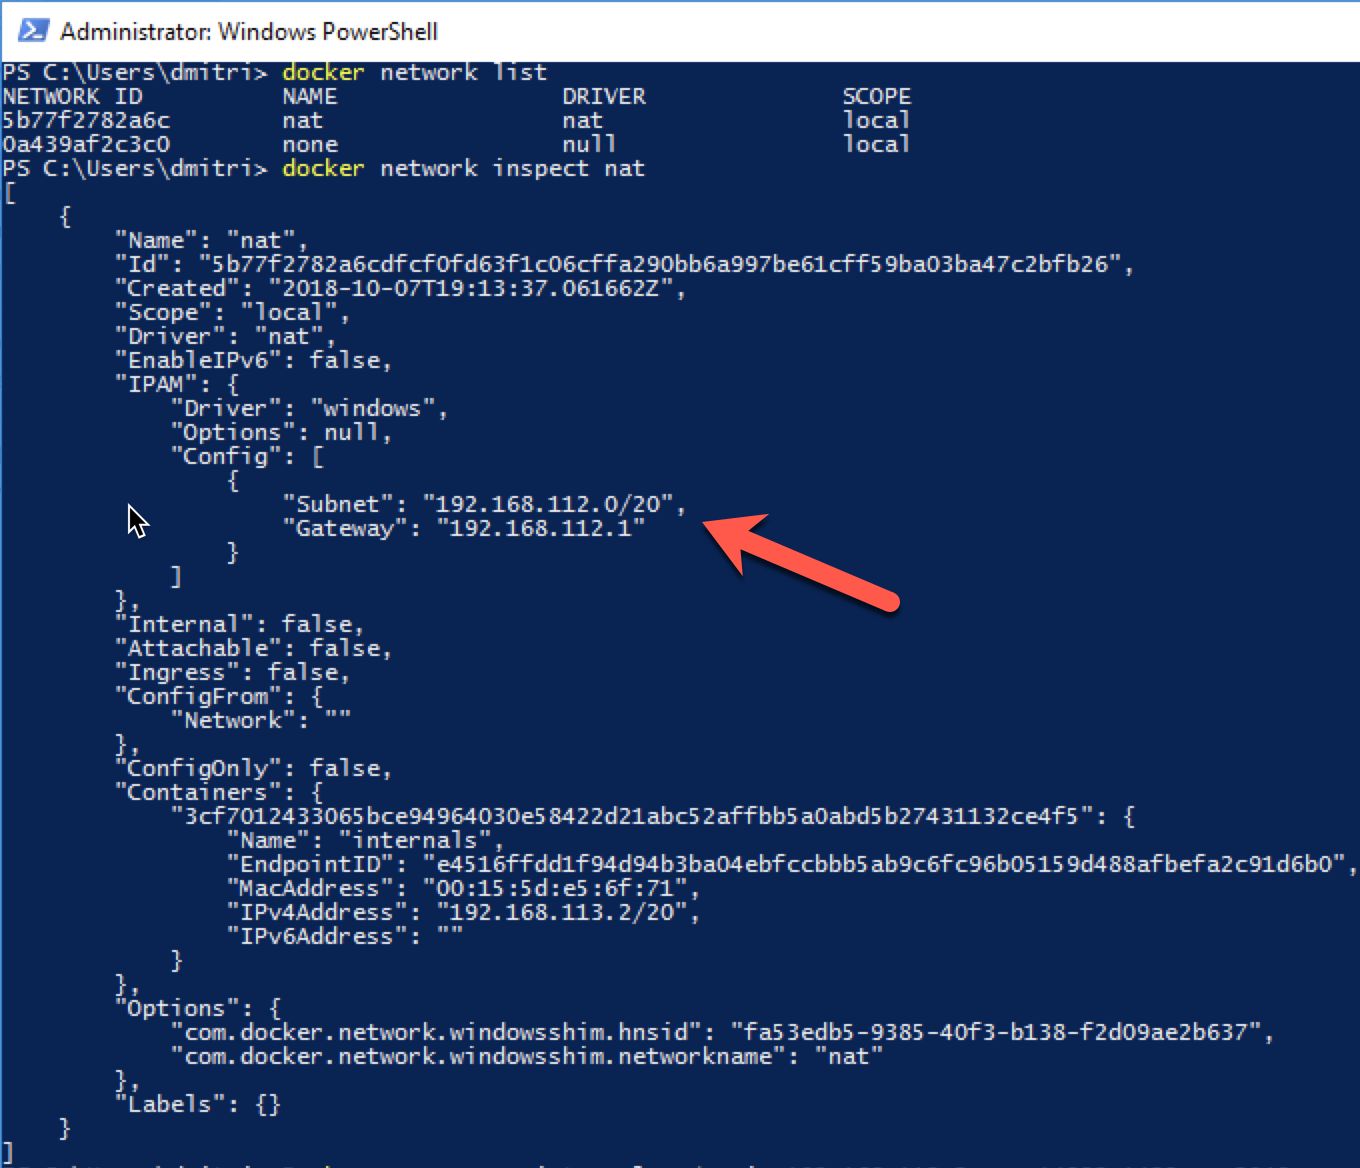
Let’s locate the subnet used by the Docker. You can do it by using the commands below. In Windows environment and with the current docker build, you should look at nat network.
docker network list

docker network inspect nat
Figure 7 shows the output of the commands. You can pick any IP address from the available range.
07. Inspect Docker Networks
Now, let’s stop and remove our container as shown below before restarting it.
docker container stop sqlserver

docker container rm sqlserver
On the side note, here are a few other commands that you can use for container management
- docker container start allows you to start stopped container.
- docket container pause and docker container unpause allows you to suspend and resume container execution.
Now, we can create another container with the command below. In addition to IP Address, there are a couple of other useful parameters. -m indicates how much memory you want to allocate to container. –cpu-count shows number of cores to allocate.
Docker run --name internals -d --ip 192.168.113.2 -p 1433:1433 -m 2048m --cpu-count 2 -e sa_password=s@1 -e ACCEPT_EULA=Y microsoft/mssql-server-windows-developer
As I already mentioned, you can start multiple containers from the single image. Just use different IP, Name and port mapping for each of them.
Building the Image
Obviously, in the real life, we do not work with vanilla SQL Server installation. We need to customize it by changing SQL Server settings and logins, creating and/or restoring the databases and do other actions. There are a couple of ways how you can do that.
The first approach is customizing existing container manually and creating the image from it using docker container commit command. After that, you can start the new containers from created image the same way as we already discussed. We will cover a couple ways to move data to and from containers later.
There is the better way, however. You can automate this process by utilizing docker build command. The process is very simple. You just need to define DockerFile, which contains the reference to the main image and specifies the build actions. You can copy scripts and database backups into the image, run SQLCMD, BCP and PowerShell scripts there – you, pretty much, have the full control. Internally, Docker runs every command inside deployment containers (creating and destroying them during the process) saving the final one as the target image.
Let’s look at the simple DockerFile below. As you can see, it specifies our SQL Server 2017 image as the base for the build. Next, it copies files from /Scripts folder into the image/deployment container and run Build.ps1 PowerShell script there.
# Building SQL Server Internals Precon V3 Environment
# Dmitri Korotkevitch
# http://aboutsqlserver.com
# dk@aboutsqlserver.com

FROM microsoft/mssql-server-windows-developer:latest

MAINTAINER Dmitri Korotkevitch "aboutsqlserver.com"

COPY Build.ps1 /

COPY Scripts/*.sql /

RUN PowerShell /Build.ps1
Below is the code from Build.ps1 script. As you can see, it creates a couple of folders and then runs the scripts using SQLCMD utility.
<#
Initialization script for Docker image
#>

New-Item -path C:\ -name DB -ItemType directory
New-Item -path C:\DB -name Backups -ItemType directory
New-Item -path C:\ -name SQL -ItemType directory

Invoke-Sqlcmd -InputFile 00.ServerSetting.sql `
-Database master `
-Server . `

Invoke-Sqlcmd -InputFile 01.DBCreation.sql `
-Database master `
-Server . `

Invoke-Sqlcmd -InputFile 02.ObjectCreation.sql `
-Database master `
-Server . `

Remove-Item /*.sql
First script in my example changed several server settings.
use master
go
EXEC sys.sp_configure N'show advanced options', N'1' RECONFIGURE WITH OVERRIDE
GO
EXEC sys.sp_configure N'max degree of parallelism', N'1'
GO
EXEC sys.sp_configure N'optimize for ad hoc workloads', N'0'
GO
EXEC sp_configure 'remote admin connections', 1 ;
go
EXEC sys.sp_configure N'backup compression default', N'1'
GO
sp_configure 'blocked process threshold', 5
GO
RECONFIGURE WITH OVERRIDE
GO
EXEC sys.sp_configure N'show advanced options', N'0' RECONFIGURE WITH OVERRIDE
GO
EXEC xp_instance_regwrite N'HKEY_LOCAL_MACHINE', N'Software\Microsoft\MSSQLServer\MSSQLServer', N'BackupDirectory', REG_SZ, N'C:\DB\Backup'
GO
EXEC xp_instance_regwrite N'HKEY_LOCAL_MACHINE', N'Software\Microsoft\MSSQLServer\MSSQLServer', N'DefaultData', REG_SZ, N'C:\DB'
GO
EXEC xp_instance_regwrite N'HKEY_LOCAL_MACHINE', N'Software\Microsoft\MSSQLServer\MSSQLServer', N'DefaultLog', REG_SZ, N'C:\DB'
GO
The second script creates an empty database.
use master
go

create database [SQLServerInternals]
on primary (name=N'SQLServerInternals', filename=N'C:\DB\SqlServerInternals.mdf', size=10MB, filegrowth = 10MB),
filegroup [FASTSTORAGE] (name=N'SqlServerInternals_FAST', filename=N'C:\DB\SqlServerInternals_FAST.ndf', size=100MB, filegrowth = 100MB),
filegroup [FG2016] (name=N'SqlServerInternals_2016', filename=N'C:\DB\SqlServerInternals_2016.ndf', size=10MB, filegrowth = 10MB),
filegroup [FG2017] (name=N'SqlServerInternals_2017', filename=N'C:\DB\SqlServerInternals_2017.ndf', size=10MB, filegrowth = 10MB),
filegroup [FG2018] (name=N'SqlServerInternals_2018', filename=N'C:\DB\SqlServerInternals_2018.ndf', size=10MB, filegrowth = 10MB)
log on (name=N'SQLServerInternals_log', filename=N'C:\DB\SqlServerInternals.ldf', size=256MB, filegrowth = 256MB);

alter database [SQLServerInternals] set recovery simple;
alter database [SQLServerInternals] modify filegroup [FASTSTORAGE] default;
go
The third creates and populates the objects.
/****************************************************************************/
/*                      SQL Server Internals v3                             */
/*                        Training Materials                                */
/*                                                                          */
/*                 Written by Dmitri V. Korotkevitch                        */
/*                    http://aboutsqlserver.com                             */
/*                      dk@aboutsqlserver.com                               */
/****************************************************************************/
/*                      Objects Creation Script                             */
/****************************************************************************/

set nocount on
go

use SQLServerInternals
go

if exists(
    select *
    from sys.tables t join sys.schemas s on t.schema_id = s.schema_id
    where s.name = 'dbo' and t.name = 'LargeRow'
)
    drop table dbo.LargeRow;
go

create table dbo.LargeRow
(
    ID int not null,
    IntField int not null,
    CharField char(2000) not null,
)
go

create unique clustered index IDX_LargeRow_ID
on dbo.LargeRow(ID)
with (/*drop_existing = on, */data_compression = none)
go
...
Obviously, you have all flexibility here. For example, you can copy and restore database backup instead of recreating it with scripts.
You can run docker build command as shown below from the same folder where DockerFile is located. You may notice that I am using -m parameter – by default, Docker allocates very limited amount of resources to deployment containers during the build. You may consider increasing the memory for the container to avoid any potential issues if you run heavy scripts.
docker build -t internalsimage . -m 2g
There is the small caveat here – security. Docker runs the build using Windows Administrator/sysadmin user, which will be removed after process is completed. It should not be a problem for majority of the cases, unless some of your code changes security context with EXECUTE AS OWNER clause and/or relies on the proper database ownership. As the workaround, you can create another sysadmin SQL Login in the beginning of the build process and use it when you run the scripts or restoring the databases later.
The beauty of this setup is maintainability. Consider the situation when you want to refresh the environment after Microsoft published newer SQL Server image in the repo. The only thing you need to do is changing the base image reference in DockerFile and re-run the build process. All images will be recreated with minimum work involved.
You can use your own images as the base images during the build. Consider the example with individual development environments we discussed earlier. Let’s assume that we want to refresh the image with production data on the weekly basis and support the situation when we need to keep some old images to run containers for complex feature development.
In this case, you may want to create the setup as shown in Figure 8 with one image that contains all configuration settings without the database using it as the base image for weekly refreshes.
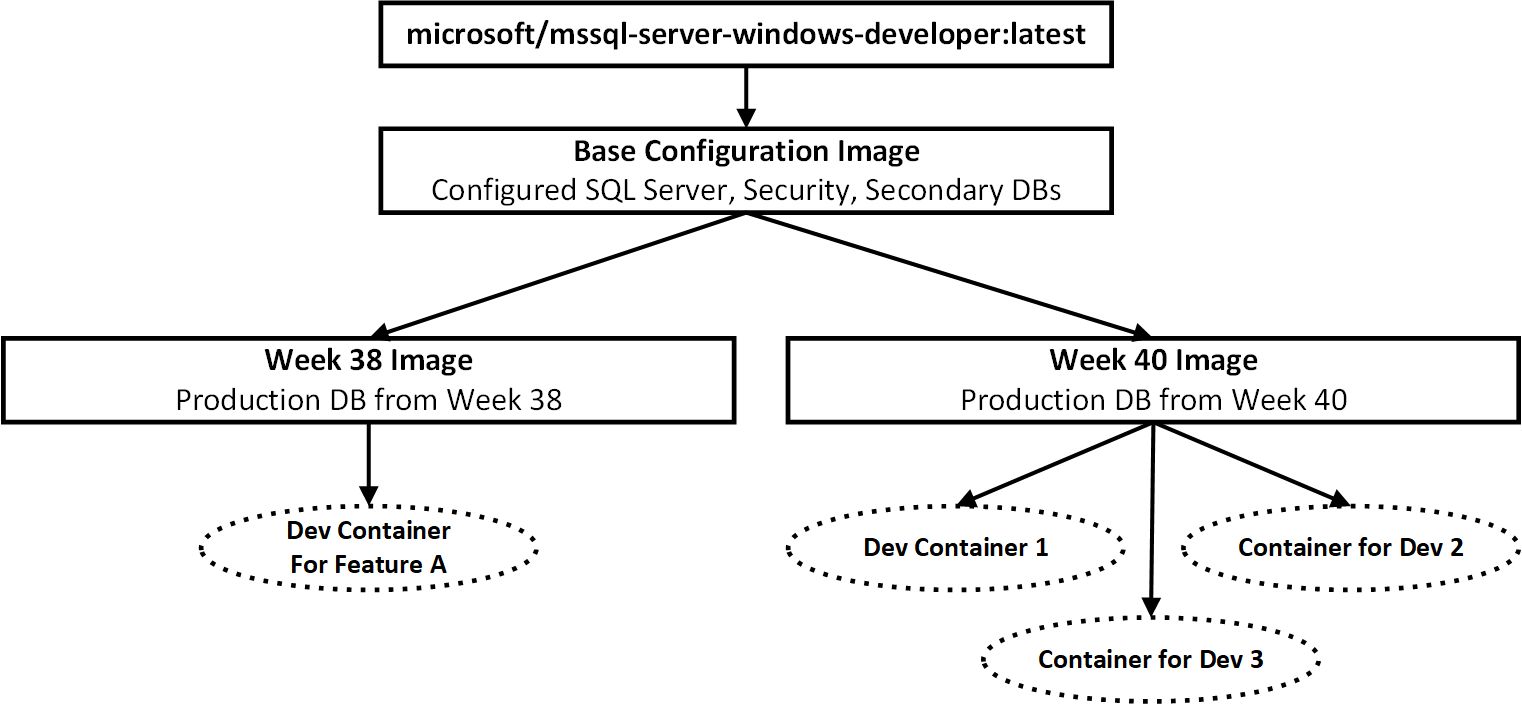
08. Possible Images/Containers Configuration for Dev Teams
A Few Other Tips
There are a couple of other commands I want to mention.
The docker exec command allows you to run a command within the container. Listing below starts interactive PowerShell session in internals container. You can create folders, run PS commands and do whatever you need to do there.
docker exec -it internals PowerShell
You can move files in between host and container using docker cp command. This is the perfect way to restore the database from the backup in the container.
# Copy files
# From host to container
docker cp mydb.bak internals:c:\backups\

# From container to host
docker cp internals:c:\backups\mydb.bak c:\hostfolder\
Wrapping Up
While Docker-based setup works great in majority of the cases, there are a few caveats I need to mention besides security context issue during the docker build. You would also have some limitations if you rely on Windows Authentication. You cannot make containers the members of domain. You can use Group Managed Service accounts (gMSA) to handle Windows Authentication but, obviously, this setup is much more complicated. Some details are available here.
Next, this setup is not necessarily the best for performance-related demos and/or load testing. I found that under heavy OLTP load, the bottleneck shifts towards network layer invalidating the results. Also, I did not find a way to connect to in-container SQL Server performance counters with PerfMon application. You can workaround it with sys.dm_os_performance_counters view, but it is less convenient.
Neither would it work very well for High Availability-related scenarios. HA in containers world be achieved in the different way and VM-based virtualization is the better choice if you need to test AlwaysOn Availability Groups and Failover Clusters.
Fortunately, you are not limited to the single technology. You can use VMs for some and containers for other scenarios. The choice is yours.
Docker PS cheatsheet and docker build demo is available for download from here.